Portal UI Integration (Support.com Cloud - Agent Navigator)
This section describes how to integrate the Agent Navigator into your application. This level of integration allows agents to use Support.com Cloud directly within your application without having to open a new browser window, log into Support.com Cloud, and manually add or update information.
The Navigator integration encapsulates a set of operations that are executed automatically, namely:
- Launch Agent Navigator from within your application.
- Log in an existing agent or create a new agent user in Support.com Cloud.
- Create or update the customer.
- Create or update the session.
- Run the service delivery session within Support.com Cloud.
Contents
- Configuring the Agent Navigator Integration
- Authentication
- Adding Authentication
- Configure Your Application
- Sample PHP App
- Execution Flow
- Troubleshooting
Configuring the Agent Navigator Integration
The following are the steps for configuring the Agent Navigator integration:
- Configure the authentication
- Configure your application
Authentication
An Authentication is the means used to verify that a request for a token has originated from a known/trusted external application.
Two types of authentication are supported:
OAuth2.0: This method is used to integrate with Salesforce, Sugar CRM and other OAuth2-capable systems and enables Support.com Cloud to make outbound API calls into these systems.Signed Request: This method is used in all other cases and it enables 3rd party applications to make Support.com Cloud inbound requests. The integration using this authentication consists of a single HTML form POST that contains a signed payload signature from the calling application to the Support.com Cloud endpoint URL. The payload is verified using a mutually- known API key. Once verified, Support.com Cloud proceeds with creating or updating agent and customer profiles, as well as creating the web session and creating/updating the service delivery session itself.
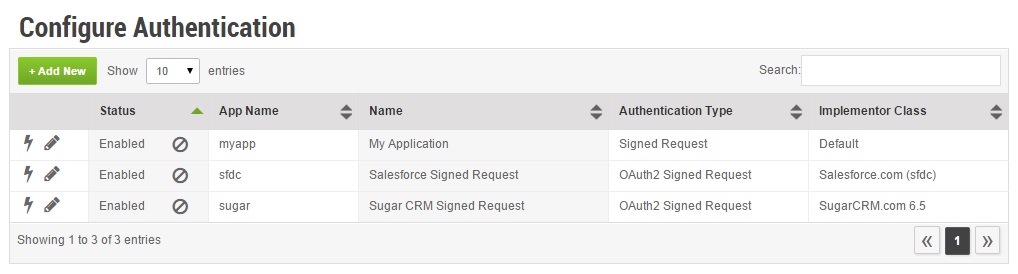
Adding Authentication
In the Configure Authentication screen, click the green Add New button at the top left of the table. The Configuration Details screen appears for the new Authentication.
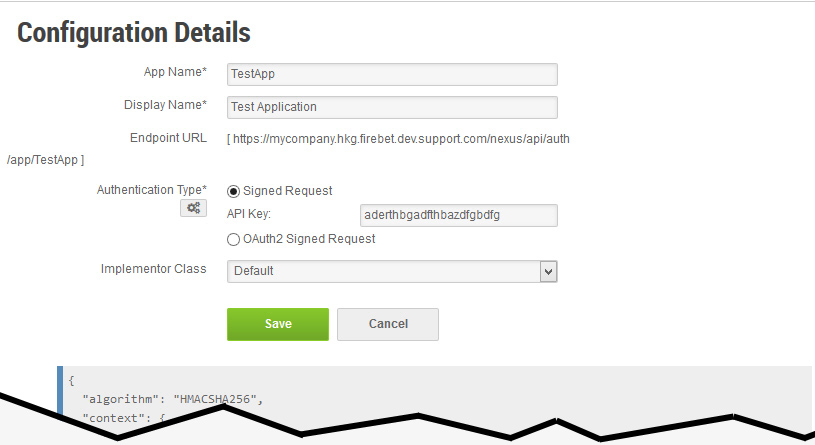
Enter the following information:
-
App Name: Unique name for the external application (required). -
Name: Name of the Authentication that will appear in the table on the Configure Authentication screen (required). -
Authentication Type: Whether the Authentication is a Signed Request (API Key) or an OAuth2 Signed Request. Select the authentication type to use for this Authentication, as follows:
To use a signed request, check the Signed Request radio button enter a value in the API Key field. (To generate a new random value for the API key, click the Generate Key icon (gears) and copy the value in the field.) This option should be selected for most applications.
If you are setting up a Salesforce or SugarCRM integration, choose check the OAuth2 Signed Request radio button and then enter the Consumer Key and Consumer Secret values in the appropriate fields, as they are configured in your Salesforce / SugarCRM app. Click the Generate Token icon (gears) to open the New Token popup, which generates a random 32-character string that can be used to generate either an API key or an OAuth2 Consumer Secret. Implementor Class: Select an Implementor Class using the Implementor Class pull-down menu. The available options are:Default: Select this option if you are not using Salesforce SFDC or Sugar CRM.- Salesforce.com (sfdc): Select this option if you are using Salesforce SFDC.
- SugarCRM.com 6.5: Select this option if you are using Sugar CRM.
NOTE: The bottom of the Configuration Details screen contains the JSON code that you must insert into the external application that will be making calls to the Support.com Cloud API. See Configuring Your Application.
{
  "algorithm":"HMACSHA256",
  "context": {
    "user": {
      "id": "[Logged in user id. This is treated as user's external id.]",
      "email": "[Logged in user email]",
      "first_name": "[Logged in user first name]",
      "last_name": "[Logged in user last name]",
      "phone": "[Logged in user phone]"
    },
    "environment": {
      "parameters": {
        "target": "[Optional Support.com UI flavor to specify which UI the portal integration intends to load.
                    Possible choices are: 'embedded', 'seesupport', 'standard'. If not specified, the default is 'standard']",
        "sessionId": "[Optional Support.com Cloud session id to load existing session vs creating a new session]",
        "referenceId": "[Optional internal id of the context object (case etc.)]",
        "referenceNumber": "[Stored as external reference in Support.com Cloud session]",
        "contactEmail": "[Email of the contact/customer]",
        "contactFirstName": "[First name of the contact/customer]",
        "contactLastName": "[Last name of the contact/customer]",
        "contactPhone": "[Primary phone number of the contact/customer]",
        "contactMobile": "[Mobile number of the contact/customer]",
        "contactOtherPhone": "[Other phone number of the contact/customer]",
        "contactId": "[Stored as external reference in the customer record in Support.com Cloud]",
        "customFields": "[Optional JSON object containing custom session fields. These fields should be configured under Custom Fields snapin. Ex: { 'origin':'portal', 'zipcode':'94063', ... }]",
        "deviceComputer": "[Optional JSON object with following optional properties: 'name' (ex: PC/Mac), 'os' (ex: Windows 7), 'os_variant' (ex: Professional), 'os_arch' (ex: 64-bit), 'os_version' (ex: 6.1.7601), 'os_lang' (ex: 1033), 'os_sp_minor' (ex: 0), 'os_sp_major' (ex: 1), 'host' (ex: MY-PC-3500), 'model' (ex: Vostro 3500), 'serial' (ex: ABCWXYZ), 'vendor' (ex: Dell Inc.), 'memory' (ex: 8135684096), 'owner' (ex: MyName), 'swap_space' (ex: 0), 'av_prods' (ex: [{\"company\":null,\"latest\":true,\"name\":\"Symantec Endpoint Protection\",\"version\":null}])]",
        "deviceMobile": "[Optional JSON object with following optional properties: 'name' (ex: Android/iOS), 'os' (ex: 4.4.4), 'serial' (ex: a890ghijk345678), 'serial2' (ex: TA9012LMXZ), 'os_sdk' (ex: 19), 'os_build' (ex: 19, KTU84P), 'os_lang' (ex: English), 'model' (ex: XT1080), 'manufacturer' (ex: Motorola), 'brand' (ex: motorola), 'cpu', 'cpu_arch' (ex:armv7l), 'memory' (1.76 GB).]",
        "assign": "[Optional bit 1/0 or boolean true/false which triggers assignment to context user. This does not apply to closed sessions.]",
        "paths": {
          "search": [
            {
              "search_type": "[Optional search types to filter available guided paths (can have one, two, three or all four): category_uid, tag, path_uid, and/or full_text. Both search_type and search_values are required and must be used together. If either category_uid or path_uid is used please use the UUID format, ie. 128-bit value with inserted hyphen characters: de305d54-75b4-431b-adb2-eb6b9e546014].",
              "search_values": "[Optional array of search values to filter available guided paths. If search_type is 'category_uid' or 'path_uid' these will be an array of uids. If search_type is 'tag' then these will be an array of strings. If search_type is 'full_text' then this will be an array with only one string, ie. ['Android']. Search values must be used along with search_type. If any of these values are invalid or not longer valid anymore, there will be a error message with more relevant details. ]"
            }
          ],
          "remote": "[Optional boolean true/false which controls a remote session. If true and search_value & search_type are null then this will launch a remote session. If true and search_value & search_type is not null then this will show 'Start Remote Connection' button. If no value is given, this will be assumed to be false.]",
          "allPaths": "[Optional boolean true/false which controls the guided path list after the first path. If true, adding a new path will show all published paths after first path is done. Else, we will show the filtered list of guided paths. If no value is given, this will be assumed to be false."
        },
        "showSessionStatusChange": "[Optional boolean true/false which controls whether the Session Open/Close slider will appear when launching a session. If true, the session status change button will be shown. If false, it will be hidden. The default value here is true.]",
        "showAssignToMeButton": "[Optional boolean true/false which controls whether the Assign To Me will appear when launching a session and the session isn't owned by the agent viewing it. If true, the Assign To Me button will be shown. If false, it will be hidden. The default value here is true.]",
        "showSessionTransferButton": "[Optional boolean true/false which controls whether Session Transfer button appear when launching a session. If true, the Session Transfer button will be shown. If false, it will be hidden. The default value is true.]"
         "user": {
          "locale": "[Optional locale used to derive language for content. Ex: en-US or en]",
          "teams": "[Optional Array of user's teams. These are created (if missing) and assigned to user. ex: [{\"teamId\":\"teamA-external-Id\",\"teamName\":\"teamA\"},{\"teamId\":\"teamB-external-Id\",\"teamName\":\"teamB\"}...]]"
        }
      }
    }
  }
}
Click Save to create the Authentication.
Configure Your Application
Your application integrates with Support.com Cloud by creating a JSON object that contains information about the agent, customer, and session. This JSON object is then passed to Support.com Cloud, which processes the request as described below in the Execution Flow.
The JSON object being passed should be formatted as follows:
{
  "algorithm": "HMACSHA256",
  "context": {
    "user": {
      "email": "",
      "first_name": "",
      "last_name": "",
      "phone": ""
    },
    "environment": {
      "parameters": {
        "target": "",
        "sessionId": "",
        "referenceId": "",
        "referenceNumber": "",
        "contactId": "",
        "contactFirstName": "",
        "contactLastName": "",
        "contactEmail": "",
        "contactPhone": ""
      }
    }
  }
}
The following table describes each of these parameters in detail.
| Parameter Name | Description | Expected Values (without quotes) |
Required? |
|---|---|---|---|
| algorithm | Algorithm selected in the Support.com Cloud Configure Authentication screen. | HMACSHA256 is the only supported algorithm at present. |
Yes |
| context | Container for the user and environment objects. |
N/A |
Yes |
| user | Contains parameter name/values for the agent. |
N/A |
Yes |
| id | Agent user ID. This is treated as user's external id in Support.com Cloud. | Alphanumeric |
No |
| Agent user email. This field is required, and the data is validated to confirm proper formatting (<name>@<account>.<suffix>). | Valid email address |
Yes | |
| first_name | Agent user first name. | Alphabetic |
Yes |
| last_name | Agent user last name. | Alphabetic |
Yes |
| phone | Agent user phone number. | Numeric |
No |
| environment | Object contains the parameters object |
N/A |
Yes |
| parameters | This contains the containers parameter name/value pairs for the customer, including CRM references and other IDs. |
N/A |
Yes |
| target |
Optional parameter to specify which UI the portal integration intends to load. Possible choices are: 'embedded', 'seesupport', 'standard'. If not specified, the default is 'standard' |
One of the following three options ['embedded', 'seesupport', 'standard'] |
No |
| sessionId |
Optional parameter to load an existing session instead of creating a new session. Leave this value blank to start a new session. Passing a valid session ID loads the existing Support.com Cloud session instead of creating a new session. If no session exists for the SessionID passed in the request, then Support.com Cloud does not process the request. |
Numeric |
No |
| referenceId | Optional internal id of the context object (such as a Salesforce or SugarCRM case ID). Used for callbacks. | Alphanumeric |
No |
| referenceNumber | Stored as an external reference in the Support.com Cloud session as a external reference ID value. The agent can view this information in Support.com Cloud by clicking on the "Session Info" link on the session tab toolbar. Note: Make sure that this field is Enabled by going to Admin > Settings > Manage Fields and checking for the external session id row in the Session Data table. | Alphanumeric |
Yes |
| contactEmail | Email of the contact/customer. This field is required, and the data is validated to confirm proper formatting (<account>@<domain>.<suffix>). | Valid email address |
Yes |
| contactFirstName | First name of the contact/customer. | Alphabetic |
Yes |
| contactLastName | Last name of the contact/customer. | Alphabetic |
Yes |
| contactPhone | Primary phone number of the contact/customer. This corresponds to the Phone_1 field in Support.com Cloud. | Numeric |
Yes |
| contactMobile | Mobile number of the contact/customer. This corresponds to the Phone_2 field in Support.com Cloud. | Numeric |
No |
| contactOtherPhone | Other phone number of the contact/customer. | Numeric |
No |
| contactId | Stored as an external customer ID in the Support.com Cloud customer record. The agent can view this information in Support.com Cloud by clicking on the "Customer" link on the session tab toolbar. Note: Make sure that this field is Enabled by going to Admin > Settings > Manage Fields and checking for the external customer id row in the Consumer Data table. | Alphanumeric |
Yes |
| customFields | JSON object containing custom session fields. These fields should be configured in the Custom Fields snapin. For example: { ‘origin':’portal’, ‘zipcode':’94063′, … } |
JSON |
No |
| session_device | Creates a device record that is tied to the session.
For mobile devices: For computers: In the above example: |
JSON |
No |
| assign | Optional bit 1/0 or boolean true/false which triggers assignment to context user. This does not apply to closed sessions. | Boolean |
No
|
| paths | Container for the path parameters. Adding this object along with it's parameters will allow you to launch a session with a certain list of filtered guided paths rather than all guided paths. If this parameter is not included, your session will be launched with ALL published guided paths. | N/A |
No
|
| search | Container for the objects that contain search_type and search_values. Must have search_type and search_values in each object. These objects control what guided paths are returned.
Example 1:
'paths': {
   'search': [
     {
      'search_type': 'category_uid',
      'search_values': [ 'ca2cd037-d48b-4996-b993-24b17fed63e2', 'e6153d16-dd1a-494b-8173-f04caed3a26d' ],
      }
    ],
   'remote': false,
   'allPaths': true
}
Expected behavior: This will launch a session that will land in the add path view with all the guided paths matched with these category ids. More details on the remote and allPaths flags below. Example 2:
'paths': {
   'search': [
     {
      'search_type': 'category_uid',
      'search_values': [ 'ca2cd037-d48b-4996-b993-24b17fed63e2', 'e6153d16-dd1a-494b-8173-f04caed3a26d' ],
     },
     {
      'search_type': 'path_uid',
      'search_values': [ 'ccddbb5e-5556-4f65-9059-523c93f48b6a' ],
     }
   ],
   'remote': false,
   'allPaths': true
}
Expected behavior: This will launch a session that will land in the add path view with all the guided paths matched with these category ids and the one path uid. More details on the remote and allPaths flags below. |
N/A |
No
|
| search_type | Optional search types to filter available guided paths (can have one, two, three or all four): category_uid, tag, path_uid, and/or full_text. Both search_type and search_values are required and must be used together. If either category_uid or path_uid is used please use the UUID format, ie. 128-bit value with inserted hyphen characters: de305d54-75b4-431b-adb2-eb6b9e546014]. | Alphanumeric |
No
|
| search_values | Optional array of search values to filter available guided paths. If search_type is 'category_uid' or 'path_uid' these will be an array of uids. If search_type is 'tag' then these will be an array of strings. If search_type is 'full_text' then this will be an array with only one string, ie. ['Android']. Search values must be used along with search_type. If any of these values are invalid or not longer valid anymore, there will be a error message with more relevant details.
Example 1:
'paths': {
   'search': [
     {
      'search_type': 'category_uid',
      'search_values':[ 'ca2cd037-d48b-4996-b993-24b17fed63e2', 'e6153d16-dd1a-494b-8173-f04caed3a26d' ],
     }
   ],
   'remote': false,
   'allPaths': true
}
Expected behavior: This will launch a session that will land in the add path view with only the guided paths matched with these category ids. The remote option is off, therefore the 'Start Remote Connection' button will be unavailable for the first guided path run, and all the paths run afterward. The allPaths option is on, which means that after the agent chooses their first guided path from this filtered list with 2 categories and they click the Add Path button all of the guided paths will now be available. Example 2:
'paths': {
   'search': [
     {
      'search_type': 'category_uid',
      'search_values': [ 'ca2cd037-d48b-4996-b993-24b17fed63e2', 'e6153d16-dd1a-494b-8173-f04caed3a26d' ],
     },
     {
      'search_type': 'tag',
      'search_values': ['printer', 'setup'],
     }
   ],
   'remote': true,
   'allPaths': false
}
Expected behavior: This will launch a session that will land in the add path view with only the guided paths matched with these tags and all the paths associated with the category ids. The remote option is on, therefore the 'Start Remote Connection' button will be available for the first guided path run, and all the paths run afterward. The allPaths option is off, which means that after the agent chooses their first guided path from this filtered list matched with these tags and they click the Add Path button the same filtered list matched with these tags and all the paths associated with the category ids. Example 3:
 'paths': {
   'search': [
     {
      'search_type': 'path_uid',
      'search_values': ['3f7538da-e632-42f5-b589-a7a1e88988a8'],
     }
   ],
   'remote': true,
   'allPaths': true
}
Expected behavior: This will launch a session that will automatically launch the path with this path uid. The remote option is on, therefore the 'Start Remote Connection' button will be available when the agent clicks the Add Path button. The allPaths option is on, which means that when the agent clicks the Add Path button all of the guided paths will now be available. Example 4:
 'paths': {
   'search': [
     {
      'search_type': 'category_uid',
      'search_values': [ 'ca2cd037-d48b-4996-b993-24b17fed63e2', 'e6153d16-dd1a-494b-8173-f04caed3a26d' ],
     },
     {
      'search_type': 'full_text',
      'search_values': ['android'],
     }
   ],
   'remote': true,
   'allPaths': true
}
Expected behavior: This will launch a session that will land in the add path view with all the paths associated with the category ids with the text 'android' will be applied to the search bar. If the user clears the search bar then the two categories will be shown without the search bar filter. The remote option is on, therefore the 'Start Remote Connection' button will be available for the first guided path run, and all the paths run afterward. The allPaths option is on, which means that when the agent clicks the Add Path button all of the guided paths will now be available. |
Array |
No
|
| remote | Optional boolean true/false which controls a remote control session. If true and search_values & search_type are null then this will launch a remote control session. If true and search_values & search_type are not null then this will show 'Start Remote Connection' button. If search_values and search_type is null, but remote is false, this is not a valid combination. If no value is given for remote, this will be assumed to be false.
Example:
  'paths': {
    'remote': true,
    'allPaths': true
  }
OR
  'paths': {
     'search': [],
     'remote': true,
     'allPaths': true
  }
Expected behavior: This will launch a session that automatically launch into a remote control session. The remote option is on, therefore the 'Start Remote Connection' button will be availble when the Add Path button is clicked. The allPaths option is on, which means that after the agent clicks the Add Path button all of the guided paths will now be available. |
Boolean |
No
|
| allPaths | Optional boolean true/false which controls the guided path list after the first path. If true, adding a new path will show all published paths after first path is done. Else, we will show the filtered list of guided paths. If no value is given, this will be assumed to be false. Recently Used paths will only be shown if this value is true and only after the first path is run. | Boolean |
No
|
| showSessionStatusChange | Optional boolean true/false which controls whether the Session Open/Close slider will appear when launching a session. If true, the session status change button will be shown. If false, it will be hidden. The default value here is true. | Boolean |
No
|
| showAssignToMeButton | Optional boolean true/false which controls whether the Assign To Me will appear when launching a session and the session isn't owned by the agent viewing it. If true, the Assign To Me button will be shown. If false, it will be hidden. The default value here is true. | Boolean |
No
|
| user.locale | Optional locale used to derive language for content. Ex: en-US or en. | String |
en
|
| user.teams | Optional Array of user's teams. These are created (if missing) and assigned to user. ex: [{"teamId":"teamA-external-Id","teamName":"teamA"},{"teamId":"teamB-external-Id","teamName":"teamB"}...] | Array |
No
|
Sample PHP App
This section provides a sample PHP script that you can run to quickly test the portal integration. It is a standalone page with no external dependencies and you can server it from any web-server with PHP support. For example, if you have PHP installed on your system and available via the command line, you can start a built-in PHP web server by:
- Coping and saving the example code bellow into an
index.phpfile. - Navigating to the directory where this file is saved.
- Running
php -S localhost:8000from that directory. - Opening your browser and navigating to
localhost:8000.
<?php
    $apikey = "KFBcbYyBteKkFbdPdgmdhDj5g76z2lLq";
    $nexus_url = "https://mycompany.nexus.dev.support.com/nexus/api/auth/app/esearch";

    $data = array(
        "algorithm" => "HMACSHA256",
        "context" => array(
            "user" => array(
                "email" =>"testuser@support.com",
                "first_name" => "Test",
                "last_name" => "User",
            ),
            "environment" => array(
                "parameters" => array(
                    // "sessionId" => "10030", Optional to open portal at a specific existing session
                    // without "sessionId" field, a new session will be created.
                    "referenceNumber" => "referenceNumber1",
                    "contactFirstName" => "John",
                    "contactLastName" => "Customer",
                    "contactEmail" => "johncustomer@domain.com",
                    "assign" => true
                )
            )
        )
    );

    $jsdata = json_encode($data);
    $base64data = base64_encode($jsdata);
    $binaryHash = hash_hmac("sha256", $base64data, $apikey, true);
    $sign = base64_encode($binaryHash);
    $payload = $sign.".".$base64data;
?>

<!DOCTYPE html>
<html lang="en">
<head>
<meta charset="UTF-8">
    <title>Sample Portal Integration for Support.com Cloud</title>
    <link rel="stylesheet" href="//cdnjs.cloudflare.com/ajax/libs/twitter-bootstrap/2.1.1/css/bootstrap.min.css"/>
    <style type="text/css">
        form {
            border: 1px solid rgba(0,0,0,0.15);
            padding: 10px;
        }
    </style>
</head>
<body>
    <div class="container">
        <h3>Data</h3>
        <pre class="data"><?php echo json_encode($data, JSON_PRETTY_PRINT);?></pre>

        <h3>Payload</h3>
        <pre class="data"><?php echo $payload;?></pre>

        <h3>Sample Form</h3>
        <form method="POST" action="<?php echo $nexus_url;?>" target="_self">
            <!-- You can use target field to open the portal in the same tab, new tab, or iframe.
              https://developer.mozilla.org/en-US/docs/Web/HTML/Element/form#attr-target -->
            <p>Invisible payload field and submit button</p>
            <input type="hidden" name="signed_request" value="<?php echo $payload;?>"></input>
            <input type="submit"></input>
        </form>
    </div>
</body>
</html>
Loading Support.com Cloud inside an IFRAME
To load Support.com Cloud portal inside an iframe, modify the sample app above as follows:
First, add an iframe anywhere inside the document, for example after the </form> tag.
<h3>Sample iframe</h3>
<iframe name="sample-iframe" style="width:100%; min-height:500px;"></iframe>
Second, change the target attribute in the form element to point to the “sample-iframe”.
<form method="POST" action="<?php echo $nexus_url;?>" target="sample-iframe">
Execution Flow
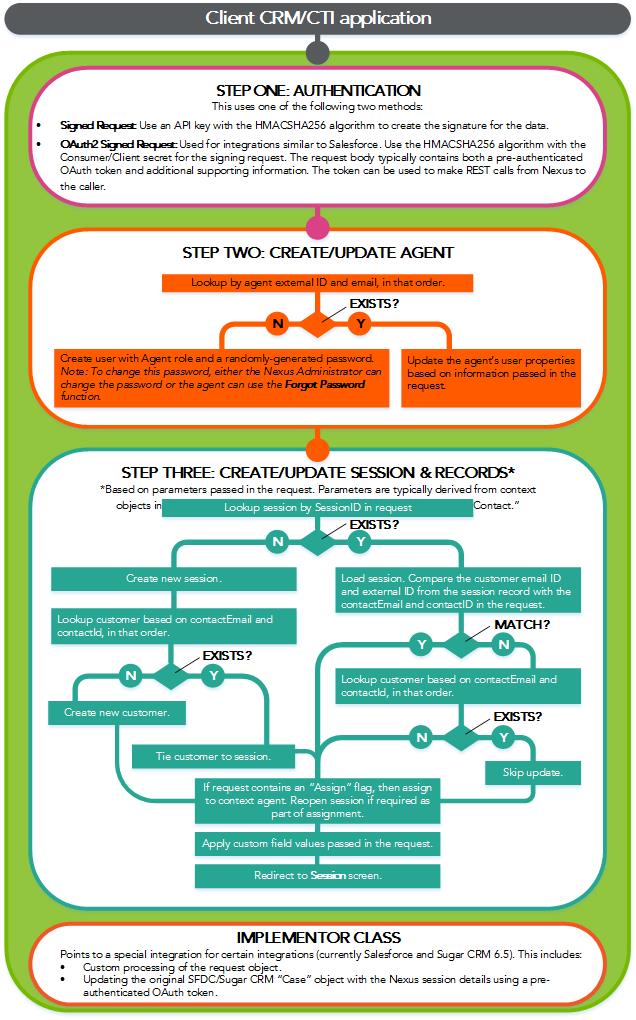
The following diagram illustrates the execution flow of the Agent Navigator instantiation.
-
Step One: Authenticate
-
Step Two: Create/Update Agent
After validating the authentication credentials, Support.com Cloud looks up the agent using that agent’s external ID. If no match is found, then Support.com Cloud searches for that agent using their email address. If a match is found, then Support.com Cloud updates the profile information for the agent based on the information passed in the request. If both searches return no matches, then Support.com Cloud will:
- Create a new agent (user with the Agent role assigned) and populate the profile for that agent with the information passed in the request. This new user will not be assigned to a team; however, an Administrator can do this within Support.com Cloud at any time.
- Generate a random password for that agent.
Note: If this agent needs to log into Support.com Cloud directly (as opposed to logging in through your CRM/CTI application), then an Administrator can change the password or the agent can use the Lost Password functionality, as described in the User/Admin Guide.
- Step Three: Create/Update Session
After validating the request and creating/updating the agent’s user account, Support.com Cloud will either create a new session or update an existing session, as appropriate. This existing session is looked up if the Session ID is passed in the request.
If the session does not already exist, then Support.com Cloud:
- Creates a new session.
- Looks up the customer based on the contactEmail and contactID passed in the request, in that order.
- If the customer exists, the customer is associated with that session, updates the customer details (name, phone number, etc.) stored in Support.com Cloud.
- If the customer does not exist, then a new customer record is created.
- Assigns the session to the agent who is logging in with this request.
- Support.com Cloud applies any custom field values and the device information passed in the request to the session.
- Support.com Cloud redirects the agent to the Session screen.
If the session already exists, then Support.com Cloud:
- Compares the email id and the external id of the customer associated with the session with the contactEmail and the contactId passed in the request.
- If there is a match, then the customer information is updated based on the values passed in the request (name, phone number, etc.).
- If there is no match, then Support.com Cloud looks for an existing customer record based on the contactEmail and contactId passed in the request, in that order. If no record is found, then a new customer record is created with the information passed in the request.
- If the Assign flag is present in the request, and the Support.com Cloud session is open, then the session is assigned to the agent who is logging in with this request. Note that if the Support.com Cloud session is closed, the request will have no impact on the session status and its assignment.
- Support.com Cloud applies any custom field values passed in the request to the session.
- Support.com Cloud redirects the agent to the Session screen.
Troubleshooting
Cannot use form method “GET”
The Support.com Cloud endpoint requires an HTML form method of type “POST.” If “GET” is used, or if the endpoint URL is simply pasted into a browser, the following message will be displayed:
Cannot GET /nexus/api/auth/app/myapp
Invalid user ID value:
If an invalid user ID value is passed, the following message will be displayed:
{
"message": "Error evaluating User"
}