Support.com Cloud SDK for iOS
Overview
Support.com Cloud SDK for iOS enables you to deliver Self Service & Assisted Support to your customers, from within your application. It allows support to be provided in the context of the user’s interaction with your application, thereby increasing the efficiency of support interaction.
Support.com Cloud SDK offers an array of benefits to your Agents:
-
Ability to engage the customers instantly through Chat.
-
Capability to collect device vitals & perform remote diagnostics like configuring Wi-Fi/Email etc.
-
Allows your agents to view the screen of your application running on the connected mobile device.
-
Enables Live Camera streaming (a.k.a SupportCam™) during a session.
-
Allows both Agent and Customer to access and view the same web page highlighting different elements on the page.
-
Allows your Customers to perform Self Service actions.
This guide is intended to assist software developers who want to embed Support.com Cloud SDK into their iOS Applications.
Contents
- Concepts
- Requirements
- Download Support.com Cloud SDK
- Setting Up Your Build Environment
- Integrating with a Swift Project
- APIs
- iOS 10 Compatibility
- Create Application Token (JWT) in Support.com Cloud
- Branding
- Auto Connect Link Support
- Registration
- FAQ
Concepts
1. Guided Paths
A Guided Path is a set of instructions (/steps) that an agent &/or consumer can follow to fix a technical support issue.
For instance, if you are an IoT oriented company, your Guided Paths could include: -
-
How to connect a Smart Bulb the first time
-
How to reset Smart Bulb
-
How to replace battery in a thermostat
-
How to get your Smart Devices connected to your hub
Support.com Cloud allows you to create both agent and consumer facing guided paths.
2. Help-Ids and Tags
Support.com Cloud allows you to associate help-ids and tags with your guided paths.
Help-ID
A help-id is an alias for your guided path. There is a one-to-one mapping between a guided path and a help-id. However, you can remove an existing help-id from one Guided Path and add it to another Guided Path.
Support.com Cloud SDK allows you to reference a help-id to show a specific guided path to your consumer, from within your application
For instance, continuing with the previous IoT example, lets assume that the first screen on your app is the on-boarding screen. If the consumer clicks on help on this screen, you could use the Support.com Cloud SDK to open the 4th Guided Path.
Tags
Tags allow you to configure a family of related guided paths. As an example, assume you associated a tag of LightBulb with both GP 1 & 2. You can then configure the Help button on your LightBulb screen to show guided path 1 & 2.
Self Help screens shown by Support.com Cloud SDK, will also allow your user to reach out to your agents via a single click on Live Help.
3. Context
Support.com Cloud SDK allows you to log important context pertaining to your user and the application. You can log : -
-
User’s identity information
-
Device/Application logs
-
Breadcrumb/activities etc.
If/when your consumer transitions from Self Help to Assisted Support, your agent will be able to view all of this context as well as all consumer actions on the guided paths.
Building further on the previous example, if the consumer clicked on Help on Light Bulb screen and used Guided Path 2, then your agent will be able to view all of this information including : -
-
Any device attributes you may have logged (state/reachability of the device)
-
Guided Path executed by the consumer (example: How to reset Smart Bulb)
-
If you logged the consumer information, then Support.com Cloud will even create a consumer record in the system.
4. Live Help
As mentioned before, Self Help screens shown by Support.com Cloud SDK, will also allow your user to reach out to your agents via a single click on Live Help.
However, Support.com Cloud SDK also allows you to directly take your consumer to Live Help.
When the session transitions to live help, your agent will be able to use all the tools such as chat, co-browse, support cam from within your application.
Requirements
You’ll need the following set-up to proceed further: -
-
Xcode 7.3.1: If you don’t have it, you can get it from the App Store.
-
iOS SDK 8.0 onwards
-
iOS 7.1 target deployment
-
armv7 and arm64 devices and/or simulator
Download Support.com Cloud SDK
1. Download Support.com Basic Cloud SDK for iOS.
Basic version of SDK includes all the above listed features except Live-Camera streaming (SeeSupport) functionality.
Support.com Basic Cloud SDK contains the following: -
-
CoreSupportcomCloudSDK.framework: Core library that enables your application to integrate to Support.com Cloud. It also includes the primary header file: SupportcomCloudSDK.h. You will be using it to call SDK APIs.
-
SupportcomCloudResources.bundle: Resource bundle containing default resources used for Support.com Cloud SDK screen branding. It includes SupportcomCloudBranding.plist file that lists all configurable branding entities.
2. Download Support.com Full Cloud SDK for iOS.
Includes all the above listed features with Live Camera streaming functionality.
Support.com Full Cloud SDK contains the following: -
-
SupportcomCloudSDK.framework: Core library that enables your application to integrate to Support.com Cloud. It also includes the primary header file: SupportcomCloudSDK.h. You will be using it to call SDK APIs.
-
SupportcomCloudResources.bundle: Resource bundle containing default resources used for Support.com Cloud SDK screen branding. It includes SupportcomCloudBranding.plist file that lists all configurable branding entities.
Note
Both the SDKs are bitcode enabled.
Sample App
Setting Up Your Build Environment
You can use either Automated Integration or Manual Integration to integrate Support.com Cloud SDK with your application.
Automated Integration using Cocoapods
To start using Support.com Cloud SDK in your project, add the following line to your Podfile according to the version which you wish to integrate.
pod 'SupportcomCloudSDK'
Then run pod install or pod update to refresh your cocoapods dependencies.
You can now move on to SDK integration.
Manual Integration
-
Launch Xcode. Open your iOS app project.
-
Drag the unzipped files, SupportcomCloudSDK.bundle & CoreSupportcomCloudSDK.framework or SupportcomCloudSDK.framework, into your Xcode project in project navigator. In the import dialog, check the box for Destination: Copy items if needed.
-
Switch to the Project > Build Settings tab and find the Other Linker Flags under “Linking” section in the build setting. Add two flags: -ObjC and -lc++.
- To setup the dependencies, switch to Build Phases. Expand Link Binary with Libraries section and add the following frameworks.
- UIKit.framework
- Foundation.framework
- SystemConfiguration.framework
- CoreTelephony.framework
- CFNetwork.framework
- CoreMedia.framework
- AVFoundation.framework
- ImageIO.framework
- libz.tbd
- libc++.1.tbd
- VideoToolbox.framework
- CoreVideo.framework
- OpenGLES.framework
- GLKit.framework
- For Support.com Full Cloud SDK integration, there is one external dependency on OpenTok framework, that has to be added with following steps: -
- Click on “Add Other” in the “Choose frameworks and libraries to add” dialog.
- Browse to the added SupportcomCloudSDK Frameworks folder (SupportcomCloudSDK.framework/Frameworks).
- Choose “OpenTok.framework”.
You are now all set to integrate and use the Support.com Cloud SDK.
Create Application Token (JWT) in Support.com Cloud
To use the Support.com Cloud SDK, you need to create and register your application token with Support.com Cloud.
1.Log into your Support.com Cloud account.
2.Goto Admin > App tokens.
3.Click on Add New.
4.Fill in details of your application: Name, Version, Unique Token ID.
5.Select iOS from the Platform drop-down.
6.Select Client Apps only in Audience.
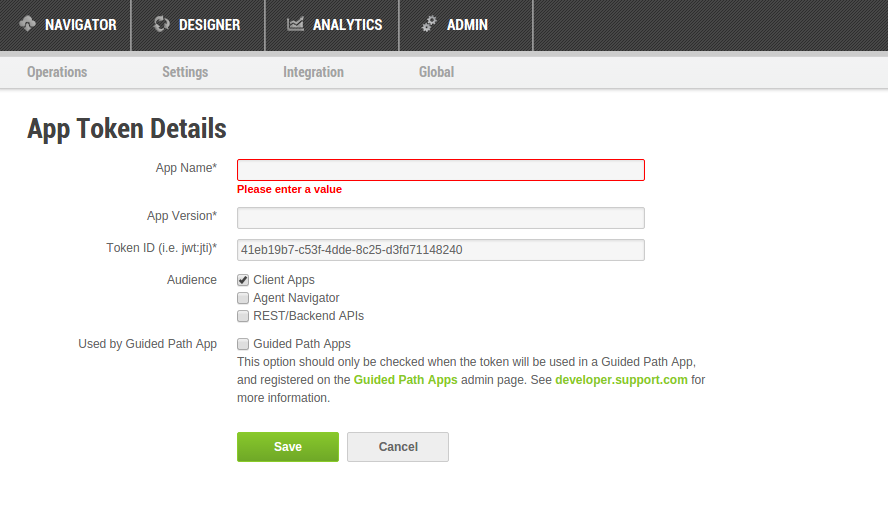
7.Click Save.
8.Click on View JWT button.
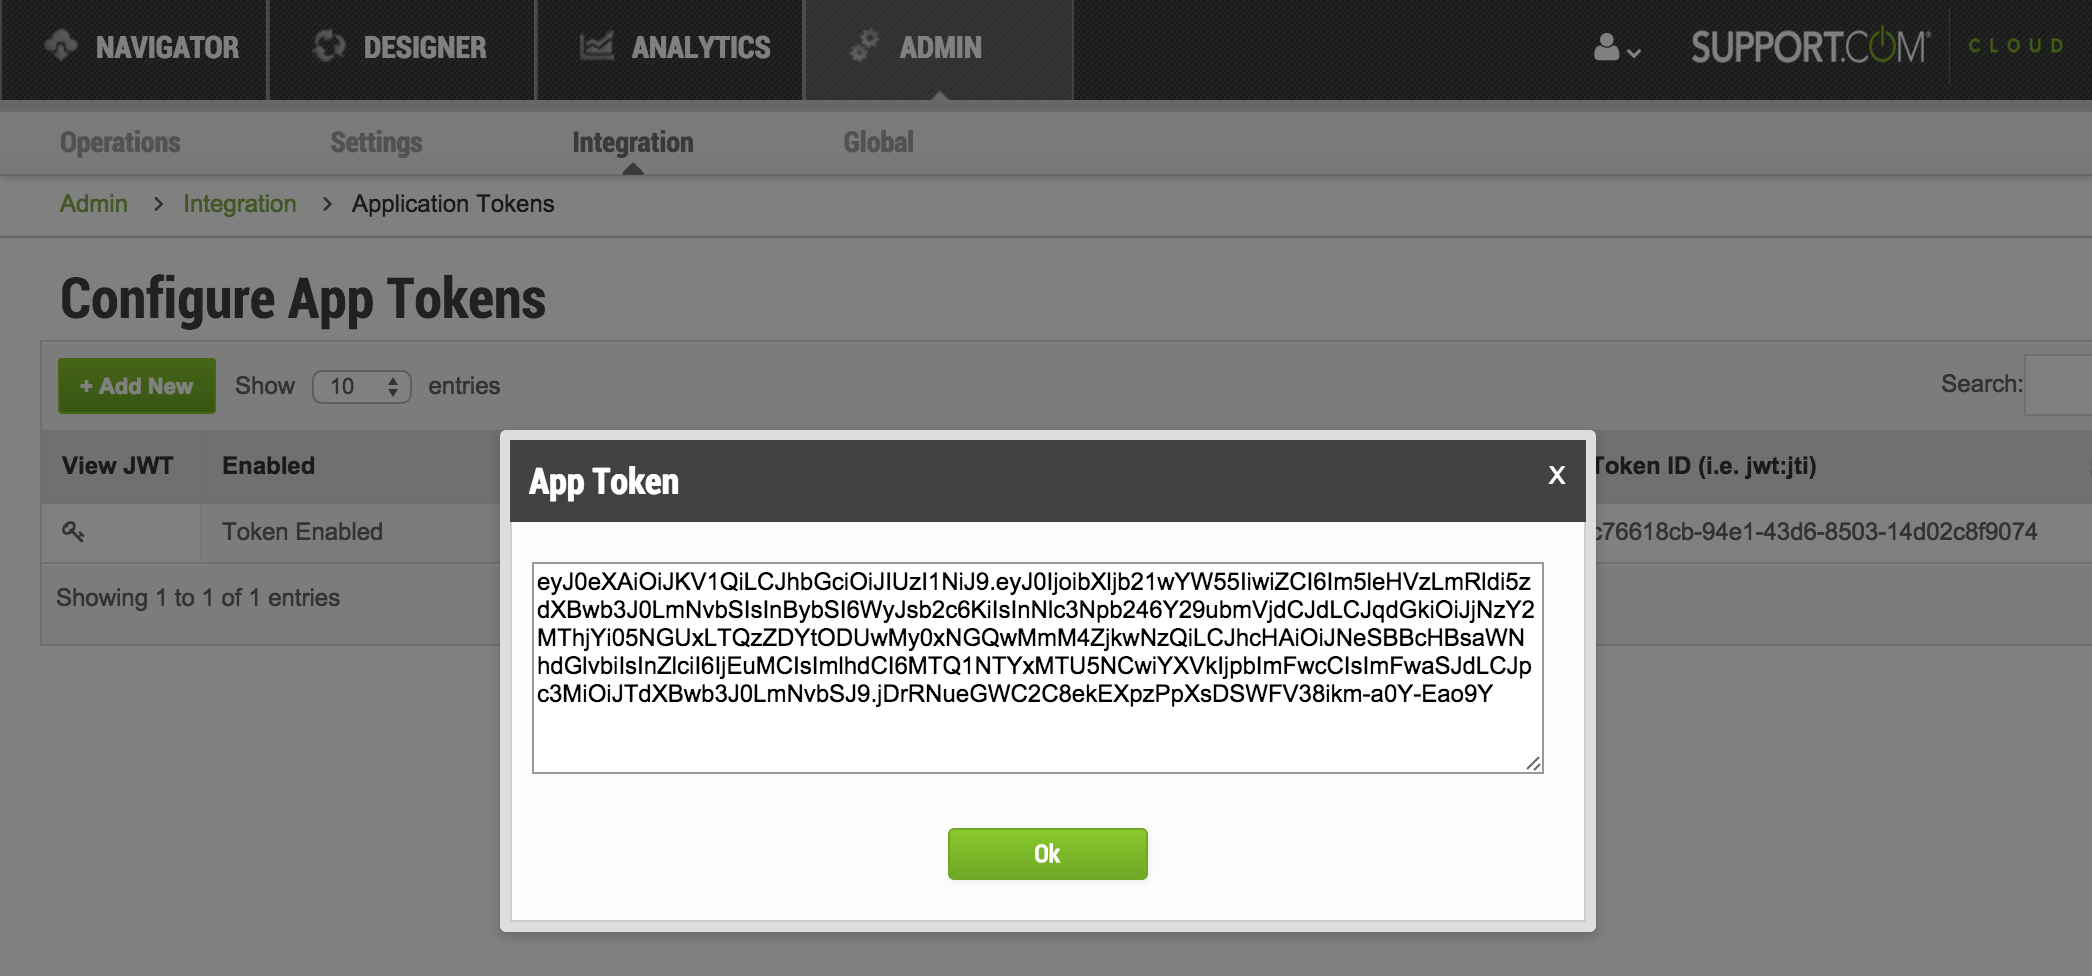
9.Copy the token. To use the SDK, you will be required to send this token as a parameter to the API.
Integrating with a Swift Project
If you are working in Swift, you can use Support.com Cloud SDK with the mix and match feature. Mix and match works by using an Objective-C bridging header to expose the required Objective-C files to your Swift code.
1. Adding an Objective-C bridging header
You can skip this step if you already have an Objective-C bridging header set up in your project.
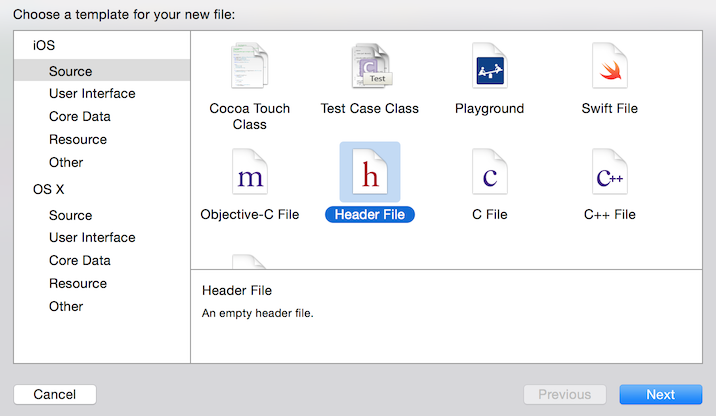
This will be your Objective-C bridging header so you can name it something appropriate like SupportComCloud-Bridging-Header.h.
Next, in your project’s Build Settings look for Objective-C Bridging Header under Swift Compiler - Code Generation.

Add the path to your bridge file. The path needs to be relative to your project. For example, if the project name is SwiftSampleApp and the bridge is SupportComCloud-Bridging-Header.h, then the path should be: SwiftSampleApp/SupportComCloud-Bridging-Header.h
2. Add SupportcomCloudSDK to the Objective-C bridging header
Inside your Objective-C bridging header, add these lines:
#import "SupportcomCloudSDK/SupportcomCloudSDK.h"
APIs
Complete API documentation can be found at API Doc.
Support.com Cloud SDK V1 provides following primary APIs: -
1. Initialize
You should invoke initialize API from within didFinishLaunching. This API accepts one argument, an application token, which is used to authenticate and authorize your application with Support.com Cloud server. You will need to generate this token at nexus.support.com.
After generating your application token, goto AppDelegate.h. Add the following lines to include the header file: -
For Objective-C:
For basic SDK integration:
#import <CoreSupportcomCloudSDK/SupportcomCloudSDK.h>

For full SDK integration:
#import <SupportcomCloudSDK/SupportcomCloudSDK.h>
For Swift 3.0:
import UserNotifications
In your AppDelegate, create a shared instance of SupportcomCloudSDK using the following.
For Objective-C:
- (BOOL)application:(UIApplication *)application didFinishLaunchingWithOptions: (NSDictionary *)launchOptions {
    [[SupportcomCloudSDK sharedInstance] initializeWithToken:@"INSERT YOUR JWT TOKEN HERE!!!**"];

    // Include the following code to register for Support.com Cloud local and remote notifications
    if ([application respondsToSelector:@selector(registerUserNotificationSettings:)]) {
        [application registerUserNotificationSettings:[UIUserNotificationSettings settingsForTypes:UIUserNotificationTypeAlert|UIUserNotificationTypeBadge|UIUserNotificationTypeSound categories:nil]];
    }
    return YES;
}
For Swift 3.0:
func application(_ application: UIApplication, didFinishLaunchingWithOptions launchOptions: [UIApplicationLaunchOptionsKey: Any]?) -> Bool {
	(SupportcomCloudSDK.sharedInstance() as AnyObject).initialize(withToken: "INSERT YOUR JWT TOKEN HERE!!!**")
    if #available(iOS 10.0, *) {
		let authOptions : UNAuthorizationOptions = [.alert, .badge, .sound]
		UNUserNotificationCenter.current().requestAuthorization(
			options: authOptions,
			completionHandler: {_,_ in })
	} else {
		// Fallback on earlier versions
		if application.responds(to: #selector(application.registerUserNotificationSettings)) {
			let types:UIUserNotificationType = ([.alert, .sound, .badge])
			let settings:UIUserNotificationSettings = UIUserNotificationSettings(types: types, categories: nil);
			application.registerUserNotificationSettings(settings)
			application.registerForRemoteNotifications()
		}
	}

	return true
}
Next, add a method to handle any failure callbacks from Support.com cloud. For this, implement the SupportcomCloudDelegate and do appropriate error handling in didReceiveSDKInitializationErrorForReason. Start by adding the following code: -
For Objective C:
#import <SupportcomCloudSDK/SupportcomCloudSDK.h> // For full SDK integration
//#import <CoreSupportcomCloudSDK/SupportcomCloudSDK.h> // For basic SDK integration

@interface ViewController () <SupportcomCloudDelegate>
@end
- (void)viewDidLoad {
    [super viewDidLoad];
    // Do any additional setup after loading the view, typically from a nib.
}

-(void)didReceiveSDKInitilizationErrorForReason:(NSString *)error{
    // Error handling to disable/hide getHelp button.
}
For Swift 3.0:
class ViewController: UIViewController, SupportcomCloudDelegate {

override func viewDidLoad() {
    super.viewDidLoad()
}

func didReceiveSDKInitilizationError(forReason error: String) {
    // Error handling to disable/hide getHelp button.
}
2. Live Help
You can invoke two versions of LiveHelp via the SDC iOS SDK.
Scenario 1: Consumer already has an agent provided connection code
This scenario is for those use-cases where the CX has already received a connection code from the agent. They could already be on a call with the agent or they may have received an SMS containing the connection code.
connectToAgent API should be used for such scenarios. This API will bring up a connection screen that will allow the CX to insert/paste the connection code received from the agent.
Scenario 2: Consumer has to escalate session to agent
In this case, CX is trying to escalate their issue to an agent. Invoke showLiveHelp API to support such use-cases. Invoking this API will bring up a screen containing chat/call options based on your live help configuration (support phone number and/or skill).
Your customers can then exercise one of two options to contact you :-
a) Call: By configuring your call-center phone number in plist, you can provide call option to your customers. Call option will display your pre-configured call-center phone number. Your customer can then call your help phone number, to talk to your support agent.
b) Chat: By configuring skill in plist, you can provide chat option to your customers so that they can instantly chat with your support agent. Skill is used to route the session automatically to the available & most relevant agent.
If neither of the values are configured, API will return an error.
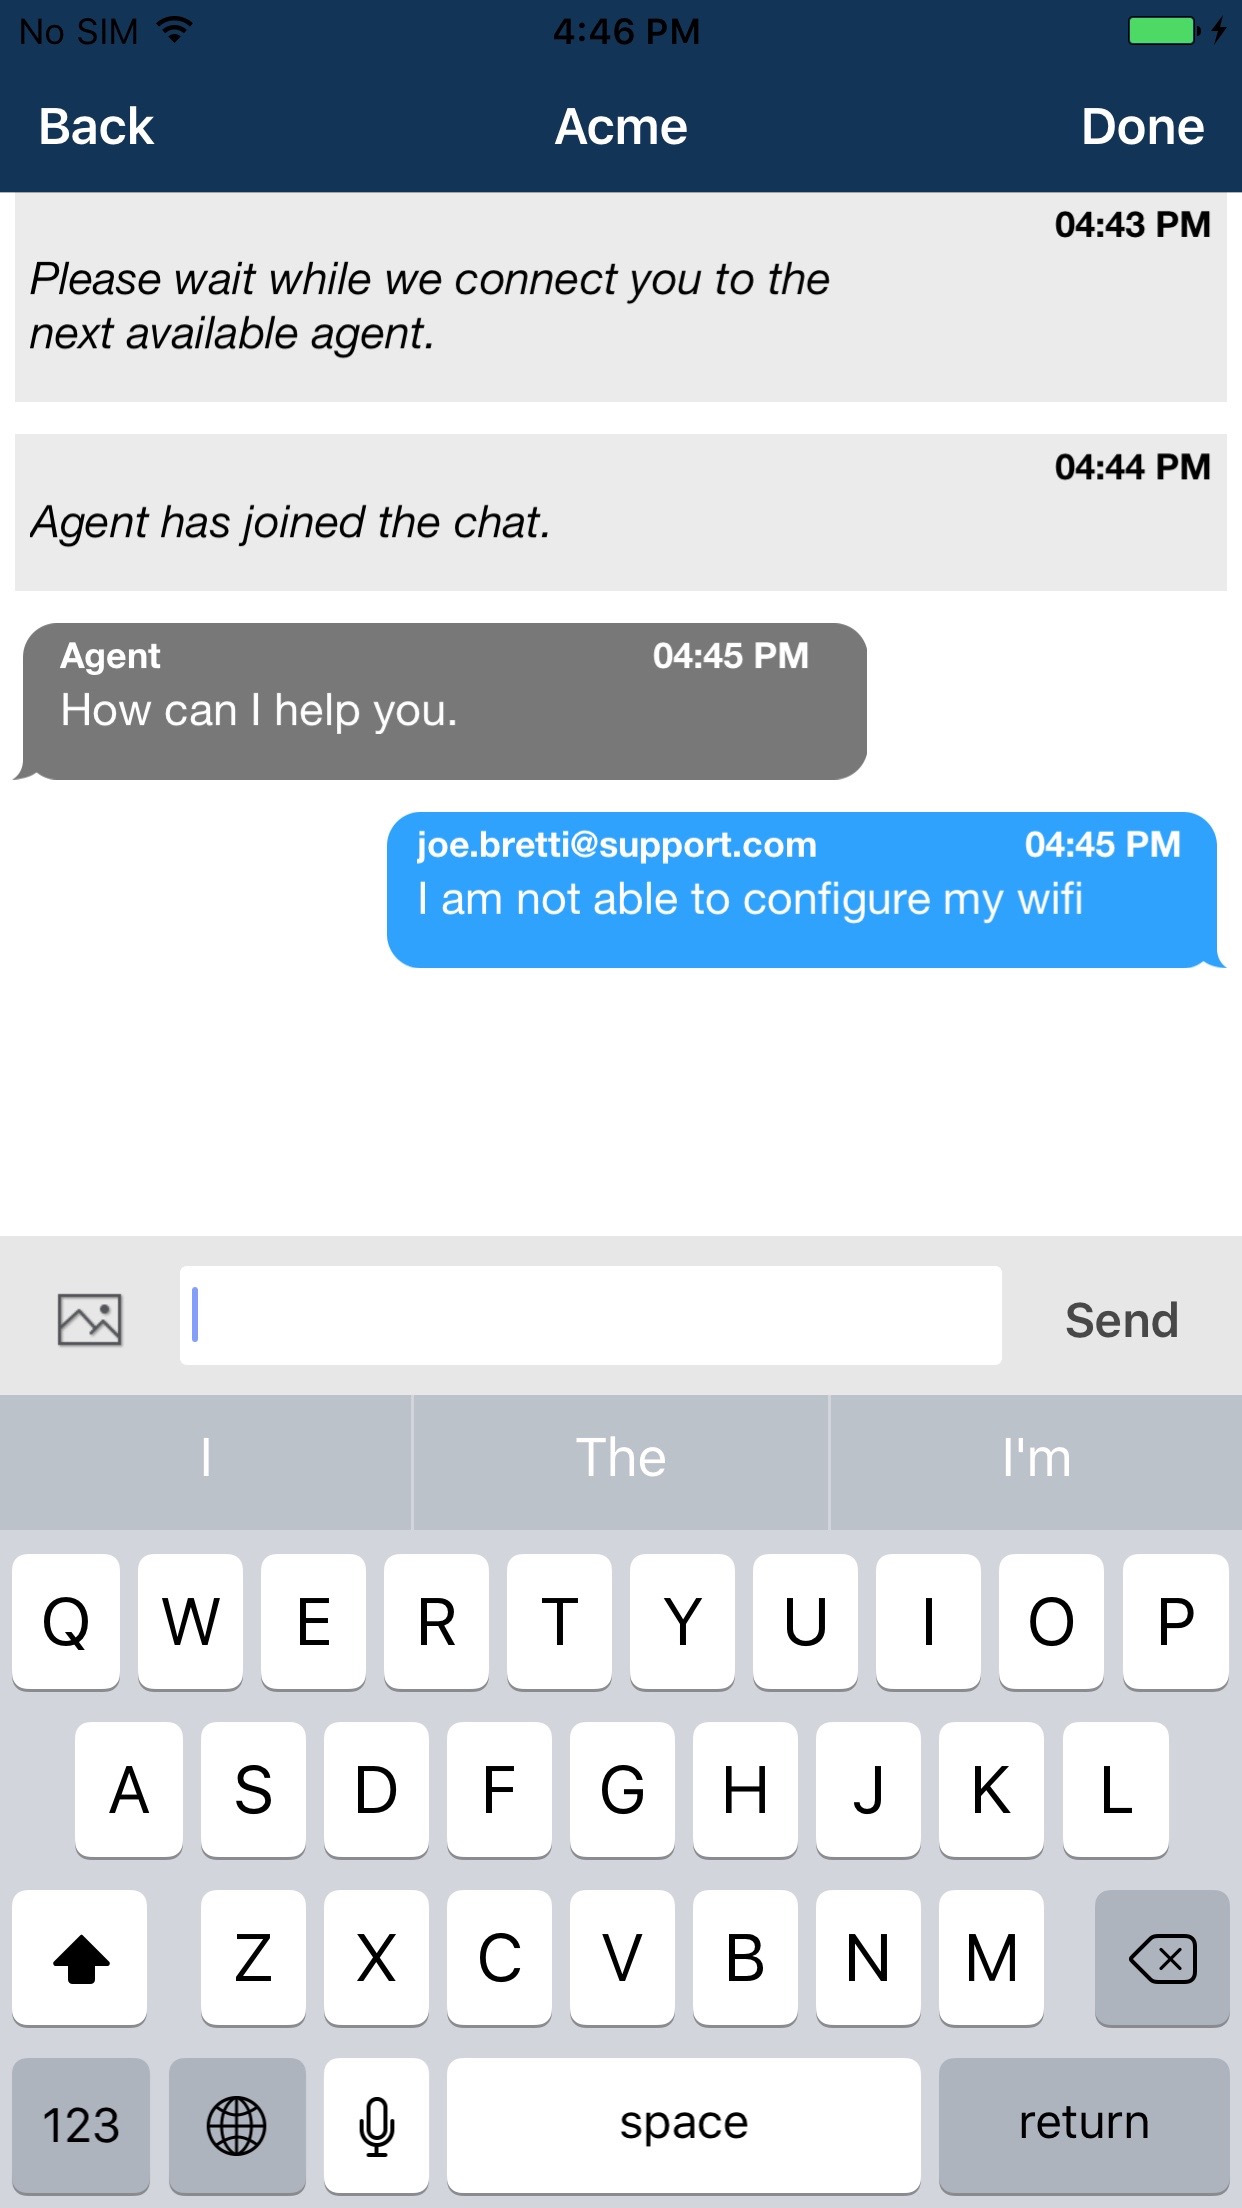
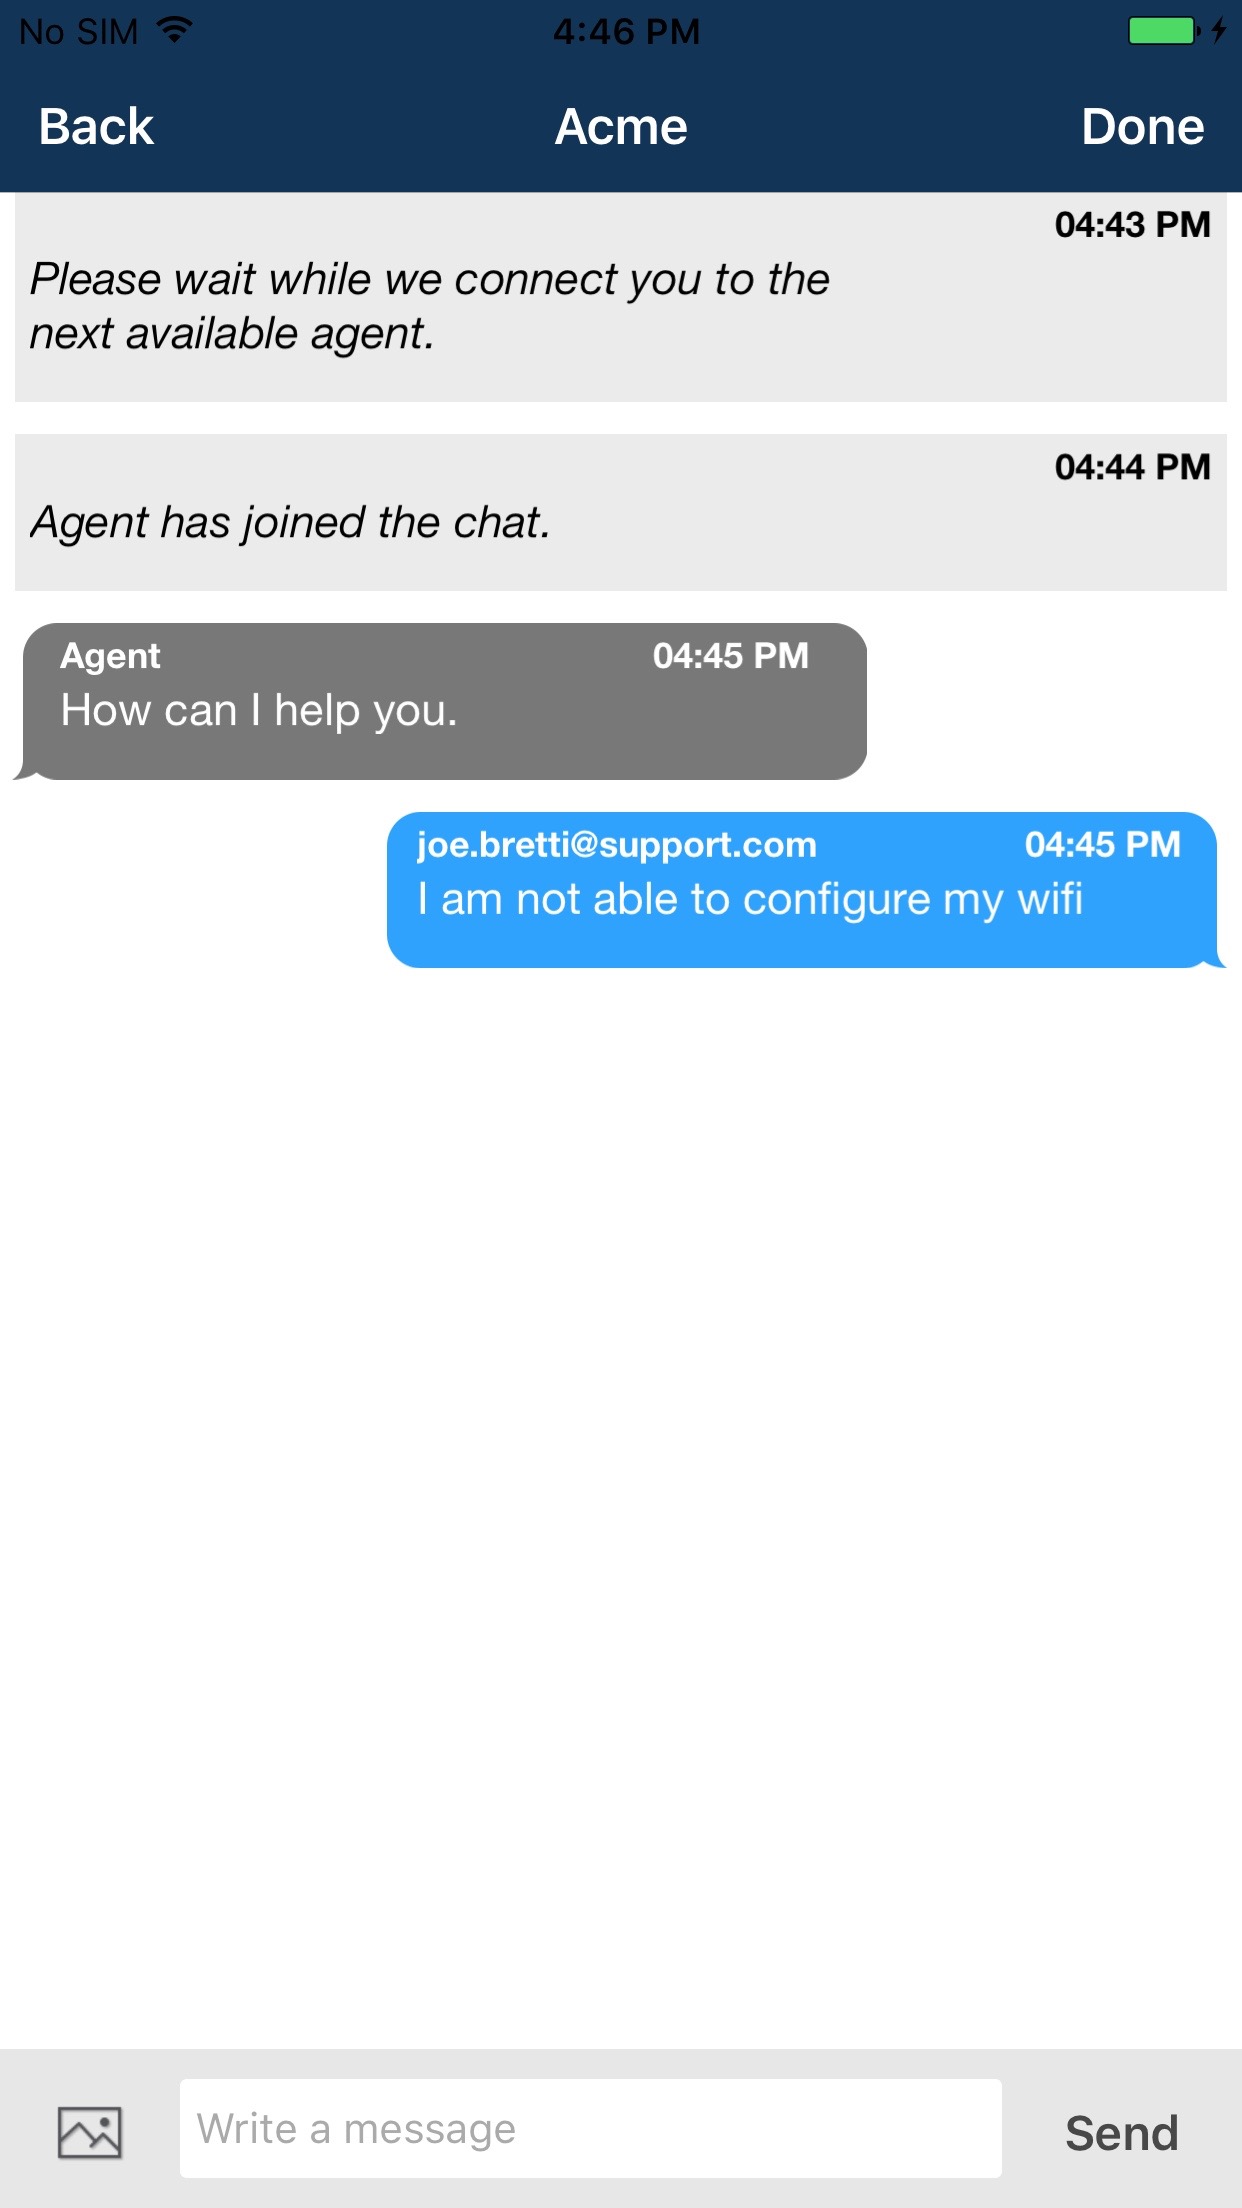
Here’s a view of the live help screen: -
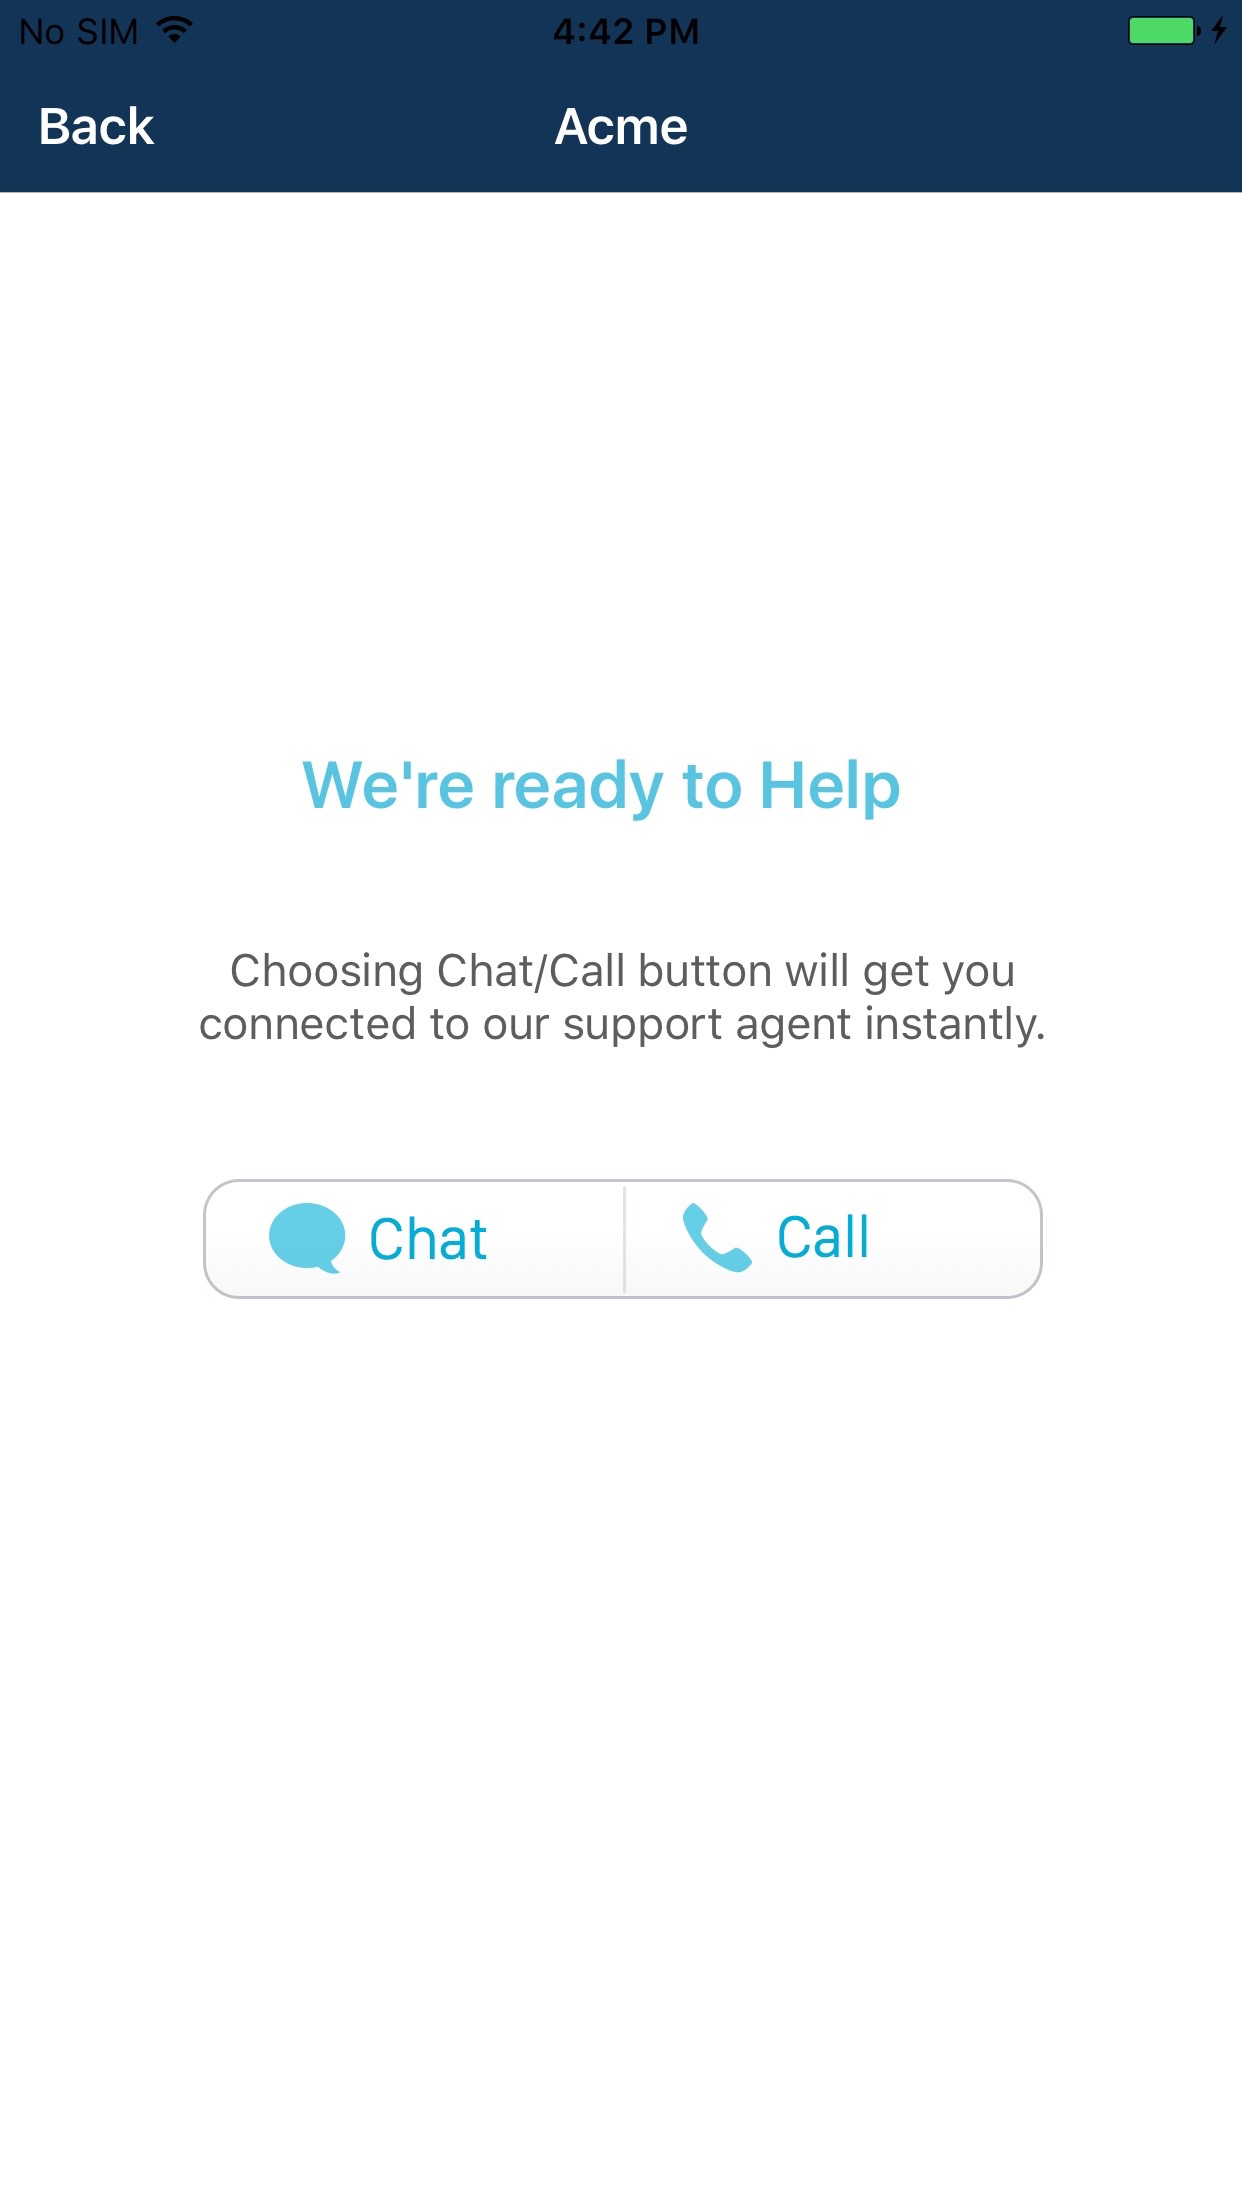
Your technical agents can then use all features of the Support.com Cloud SDK: chat with the customer, co-browse your app, push URLs, execute supported commands and use SupportCam™.
To show Live Help, add “Assisted Support” or “Live Help” button in your application screen. In the Get Support Button handler, please call the following code: -
For Objective-C:
[[SupportcomCloudSDK sharedInstance] showLiveHelp];
For Swift 3.0:
(SupportcomCloudSDK.sharedInstance() as AnyObject).showLiveHelp();
Call below API to start live session using connection code
For Objective-C:
[[SupportcomCloudSDK sharedInstance] connectToAgent];
For Swift 3.0:
(SupportcomCloudSDK.sharedInstance() as AnyObject).connectToAgent();
You can also call the following to determine if live help is still active
For Objective-C:
[[SupportcomCloudSDK sharedInstance] isLiveHelpActive];
For Swift 3.0:
(SupportcomCloudSDK.sharedInstance() as AnyObject).isLiveHelpActive();
You can resume to already running session by calling:
For Objective-C:
[[SupportcomCloudSDK sharedInstance] resumeHelp];
For Swift 3.0:
(SupportcomCloudSDK.sharedInstance() as AnyObject).resumeHelp();
To end Live Help following API must be called.
For Objective-C:
[[SupportcomCloudSDK sharedInstance] exitHelp];
For Swift 3.0:
(SupportcomCloudSDK.sharedInstance() as AnyObject).exitHelp();
3. Self Help
Using Self Help APIs you can embed Self Help directly in your application and surface relevant guided paths.
Self help topics can be queried by help id or an array of tags.
For Objective C:
    [[SupportcomCloudSDK sharedInstance] showSelfHelpForId:@"Your Help-ID here!!!!" withDisplayOrder:[NSArray arrayWithObjects:@"search",@"categories",@"paths", nil] onViewController:nil];

	[[SupportcomCloudSDK sharedInstance] showSelfHelpForTags:[NSArray arrayWithObjects:@"Tag-1", @"Tag-2", nil] withDisplayOrder:[NSArray arrayWithObjects:@"search",@"categories",@"paths", nil] onViewController:nil];

	@param Id: Help Id of guided path(s).
	@param Tags: Tag(s) of guided path(s).

	@param displayOrder : Array of display order strings. Order in which self support page should load (For ex. search, categories, paths, etc). If this array is empty then the display order is @"paths"

	@param viewController : Pass your viewcontroller inherited from SDCWebViewController if you want to display self service content in your view, if you pass nil then self support UI from SDK will be used.
For Swift 3.0:
(SupportcomCloudSDK.sharedInstance() as AnyObject).showSelfHelp(forId: "Your Help-ID here!!!!", withDisplayOrder: (NSArray(objects:"search","categories","paths") as [AnyObject]), on: nil);

(SupportcomCloudSDK.sharedInstance() as AnyObject).showSelfHelp(forTags: (NSArray(objects:"Tag-1","Tag-2") as [AnyObject]), withDisplayOrder: (NSArray(objects:"search","categories","paths") as [AnyObject]), on: nil);

@param Id: Help Id of guided path(s).
@param Tags: Tag(s) of guided path(s).

@param displayOrder : Array of display order strings. Order in which self support page should load (For ex. search, categories, paths, etc). If this array is empty then the display order is @"paths"

@param viewController : Pass your viewcontroller inherited from SDCWebViewController if you want to display self service content in your view, if you pass nil then self support UI from SDK will be used.
You can also start self help without passing help id or tag(s). But this will load all the available guilded paths from server.
For Objective-C:
[[SupportcomCloudSDK sharedInstance] showSelfHelp];
For Swift 3.0:
(SupportcomCloudSDK.sharedInstance() as AnyObject).showSelfHelp();
By default, each call to showSelfHelp will clear the context from a previous call (see below). If you want to preserve the context between each call, you should set
For Objective C:
[[SupportcomCloudSDK sharedInstance] preserveContext:TRUE];
For Swift 3.0:
(SupportcomCloudSDK.sharedInstance() as AnyObject).preserveContext(true)
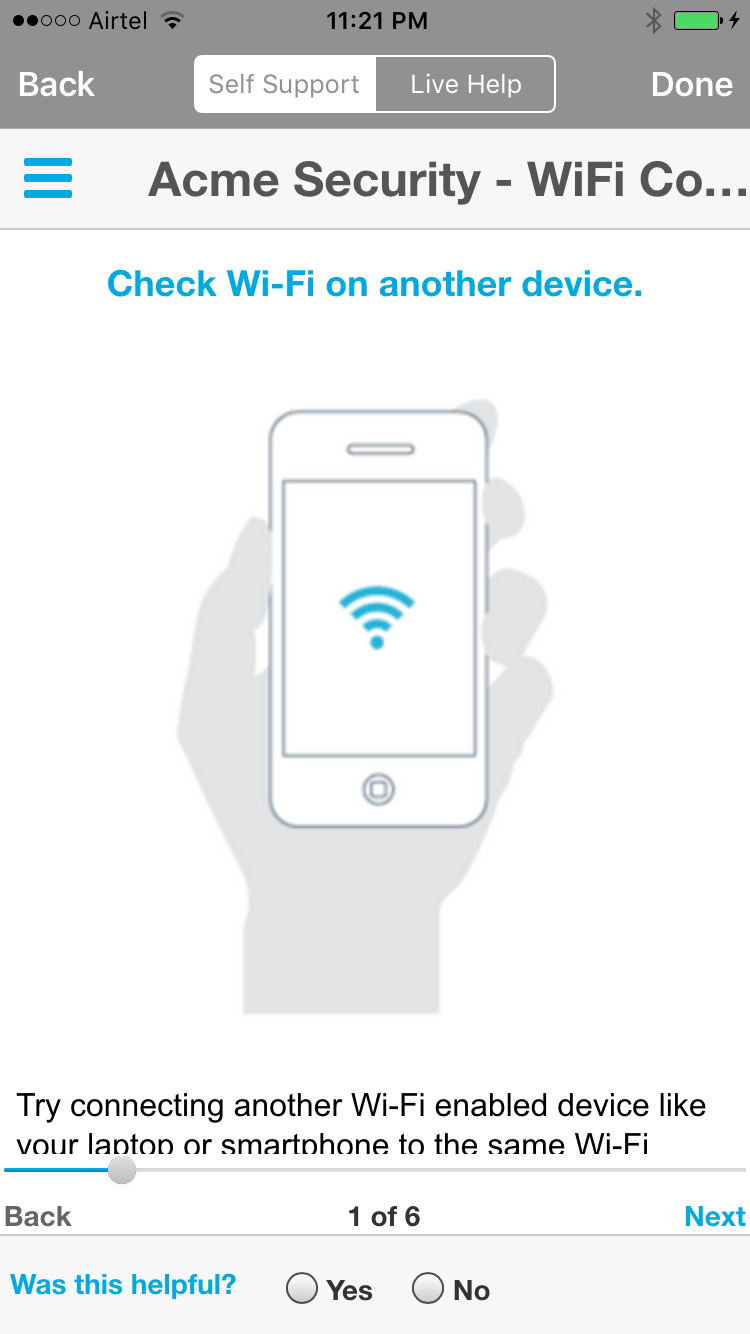
This is what the self help screen looks like: -
4. Context
These APIs should be invoked whenever you would like to set information about a user.
Identity: A user’s identity context generates a corresponding consumer within Support.com Cloud. All calls accept a single string argument.
For Objectvie C:
[[SupportcomCloudSDK sharedInstance] setFirstName:@"Consumer's FirstName here!!"];
[[SupportcomCloudSDK sharedInstance] setLastName:@"Consumer's LastName here!!"];
[[SupportcomCloudSDK sharedInstance] setEmail:@"Consumer's Email here!!"];
[[SupportcomCloudSDK sharedInstance] setExternalID:@"Consumer's ExternalID here!!"];
[[SupportcomCloudSDK sharedInstance] setPhoneNumber:@"Consumer's Phone Number here!!"];
For Swift 3.0:
(SupportcomCloudSDK.sharedInstance() as AnyObject).firstName = "Consumer's FirstName here!!"
(SupportcomCloudSDK.sharedInstance() as AnyObject).lastName = "Consumer's LastName here!!"
(SupportcomCloudSDK.sharedInstance() as AnyObject).email = "Consumer's Email here!!"
(SupportcomCloudSDK.sharedInstance() as AnyObject).externalID = "Consumer's ExternalID here!!"
(SupportcomCloudSDK.sharedInstance() as AnyObject).phoneNumber = "Consumer's Phone Number here!!"
Helper API to simultaneously set e-mail, firstname, lastname is also available: -
For Objective C:
[[SupportcomCloudSDK sharedInstance] setEmail:@"john.doe@example.com" withFirstName:@"John" lastName:@"Doe"];
For Swift 3.0:
(SupportcomCloudSDK.sharedInstance()as AnyObject).setEmail("john.doe@example.com", withFirstName: "John", lastName: "Doe")
Helper API to simultaneously set firstname and lastname is also available: -
For Objective C:
[[SupportcomCloudSDK sharedInstance] setFirstName:@"John" andLastName:@"Doe"];
For Swift 3.0:
(SupportcomCloudSDK.sharedInstance()as AnyObject).setFirstName("john", andLastName: "Doe")
If you want to preserve this context data between each session, call SupportcomCloudSDK.preserveContext(true)., before the self help and assisted service api calls.
Logging / data:
The context APIs also provide support for logging actions, device information, or content information about a user.
Each call accepts a string for a key name and an optional object or primitive for the data value.
For Objective C:
[[SupportcomCloudSDK sharedInstance] logAction:@"Your actions name here!!"];

[[SupportcomCloudSDK sharedInstance] logAction:@"Your actions name here!!" withData:[NSDictionary dictionaryWithObjectsAndKeys:@"value1",@"key1",@"value2",@"key2",nil]];

[[SupportcomCloudSDK sharedInstance] logDevice:@"Device name here!!"];

[[SupportcomCloudSDK sharedInstance] logDevice:@"Device name here!!"]  withData:[NSDictionary dictionaryWithObjectsAndKeys:@"deviceValue1",@"deviceAttribute1",@"deviceValue2",@"deviceAttribute2",nil]];

[[SupportcomCloudSDK sharedInstance] logContent:@"Your content here!!"];

[[SupportcomCloudSDK sharedInstance] logContent:@"Your content here!!" withData:]:[NSDictionary dictionaryWithObjectsAndKeys:@"value1",@"key1",@"value2",@"key2",nil]];
For Swift 3.0:
(SupportcomCloudSDK.sharedInstance() as AnyObject).logAction("Your actions name here!!")
(SupportcomCloudSDK.sharedInstance() as AnyObject).logAction("Your actions name here!!", withData: [
    "key1" : "value1",
    "key2" : "value2"
])

(SupportcomCloudSDK.sharedInstance() as AnyObject).logDevice("Device name here!!")
(SupportcomCloudSDK.sharedInstance() as AnyObject).logDevice("Device name here!!", withData: [
    "deviceAttribute1" : "deviceValue1",
    "deviceAttribute2" : "deviceValue2"
])

(SupportcomCloudSDK.sharedInstance() as AnyObject).logContent("Your content here!!")
(SupportcomCloudSDK.sharedInstance() as AnyObject).logContent("Your content here!!", withData: [
    "key1" : "value1",
    "key2" : "value2"
])
Clearing context
You can also clear a user’s context, or their identity information, specifically.
For Objective C:
[[SupportcomCloudSDK sharedInstance] clearContext];
[[SupportcomCloudSDK sharedInstance] clearIdentity];
For Swift 3.0:
(SupportcomCloudSDK.sharedInstance()as AnyObject).clearContext()
(SupportcomCloudSDK.sharedInstance()as AnyObject).clearIdentity()
iOS 10 Compatibility
Starting iOS 10, Apple requires developers to declare access to privacy-sensitive controls ahead of time. To comply with this new privacy requirement, developers must add the required keys as mentioned below:
Add “NSPhotoLibraryUsageDescription” and “NSCameraUsageDescription” to the Info.plist.
Warning! Failing this iOS 10 will exit the app by crashing when user tries to access the controls of camera or photo library.
Branding
Support.com Cloud SDK can be customized, to match the look and feel of your iOS application. All of the UI customization can be specified under SupportcomCloudResources.bundle/SupportcomCloudBranding.plist.
iOS SDK customization is categorized into the following: -
1. Generic branding settings
This area deals with common styling across all SDK Screens such as fonts, colors, backgrounds etc.
Navigation Bar
You can set attributes such as navigation bar title, font, color, title color etc.
You can additionally control the look and feel of buttons displayed on the navigation bar. By default,
i) Back Button : Support.com iOS SDK displays a Back button on the Help Screens to allow a consumer to get back to the 3rd party app screen during the course of a self help or live help session. When consumer taps on back button, their help session is still in progress and can be accessed from any of your screens by tapping on the chat head displayed in the status bar.
You can control whether the chat head will be displayed or not. You can also specify a different icon for the chat head. If you would like to provide a custom implementation, you can do so by registering for isLiveHelpActive.
ii) Done button: It is displayed to allow consumer to close the help session and return to the 3rd party app screen. You can also specify a button image for the same. When image is specified, the name will not be displayed. If neither are specified, the button will be hidden.
Live Help Configuration
Live Help screen shows two options: call & chat. To configure these options, you can use the following fields from the plist: -
a) phone: This is your help / call-center phone number. If no phone is specified, live help mode will not display call option.
b) skill: If your customer chooses the chat option in the live help screen, you must specify the skill to which the session should be routed. Based on the skill, the session will be assigned to the available and relevant support agent. If no skill is passed, live help will not display chat option.
One of phone/skill must be configured to use Live Help.
Others
a) You can specify fonts that will be used across all screens as well as on alerts.
b) Notifications related settings allow you to control whether or not the Support.com Cloud SDK notification count should be displayed on your application.
c) Other settings you can control as part of the Generic configuration includes T&C and Privacy URL to get consumer consent during the course of a live help escalation.
2. Live Help Screen
Live Help settings allow you to customize look and feel of chat and/or call buttons.
a) Connect title, title color, text message & message color
b) Call button: You can control call button title & call button icon image.
c) Chat button: You can control chat button title & chat button icon image.
d) Button Attributes: You can control button border color, button background color & button text color.
3. Chat Screen
Chat screen displays 3 types of messages: messages sent by agent, messages sent by consumer and system messages.
Agent Message
You can control time text color, bubble background image, message text color, sender text color.
Given below are the preferred icon size per resolution that are configurable:
| Preferred Icon Size Per Resolution | 1x | 2x | 3x |
| Chat Callout | 43X32 | 86X64 | 129X96 |
User Message
You can control time text color, bubble background image, message text color, sender text color. Given below are the preferred icon size per resolution that are configurable:
| Preferred Icon Size Per Resolution | 1x | 2x | 3x |
| Chat Callout | 43X32 | 86X64 | 129X96 |
System Message
You can control the background color, time text color and message text color.
Chat screen has a message composer. You can configure its background color. You can also configure the title/color for the send button.
4. Support Alerts
SDC Cloud SDKs display various alerts to the consumer during the course of a live help session for instance to get consumer consent for streaming. You can control look and feel of these alerts: -
a) Title & Message: You can control alert description color and alert title color.
b) Allow button: You can control allow button color, allow title and allow title color.
c) Cancel button: You can control cancel button color, cancel title and cancel title color.
Auto Connect Link Support
This feature will enable your application to launch automatically and connect to support session as soon as user clicks the SMS/Mail link provided by support agent. Here we will be using IOS Universal Link. For this feature to work as expected application will have to make following changes:
In order to register your Xcode project for Universal Links, you need to create an App ID in the Apple developer portal and enable the proper entitlements. This is very similar to the configuration required for in-app purchases.
Note: You cannot use a wildcard app identifier for Universal Links
a) Enable ‘Associated Domains’ in your app identifier on developers.apple.com:
For your pre-existing or work-in-progress App Identifier, scroll down and check the ‘Associated Domains’ services.
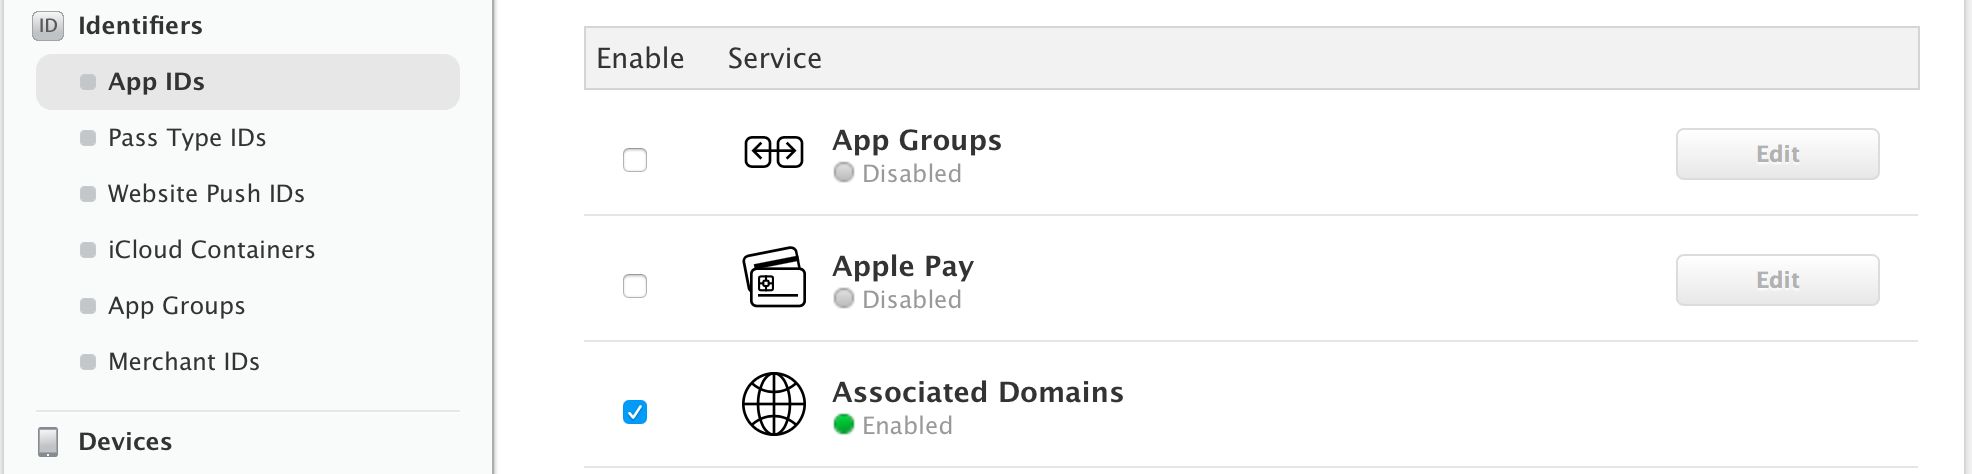
Scroll down and click ‘Save’.
b) Enable ‘Associated Domains’ in your Xcode project: Now, you’ll want to enable the ‘Associated Domains’ entitlement within your Xcode project. First, make sure that your Xcode project has the same Team selected as where you just registered your App Identifier. Then go to the Capabilities tab of your project file.
Scroll down and enable ‘Associated Domains’ so that the accordion expands.
If you see an error like this, check:
i. that you have the right team selected
ii. your Bundle Identifier of your Xcode project matches the one used to register the App Identifier
c) Add the domain entitlement
In the domains section, add the appropriate domain tag. You must prefix it with “applinks:”. In this case, you can see we added “applinks:nexus.support.com”.
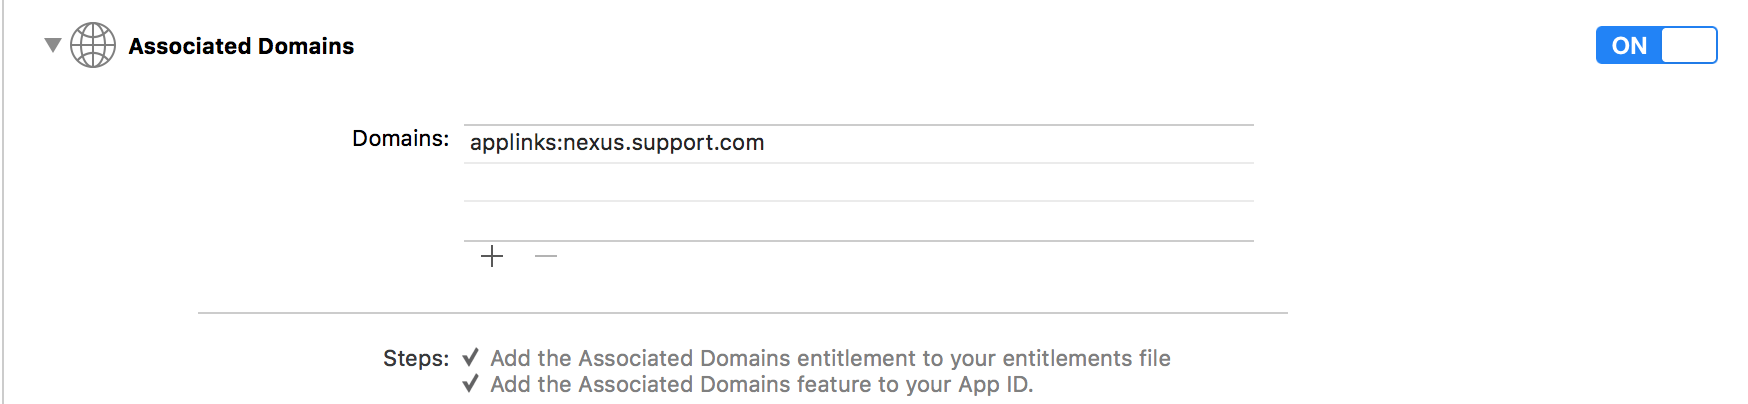
d) Refer below section to register your application ID and application prefix with Support.com Cloud.
e) Copy below code in your AppDelegate class:
For Objective C:
-(BOOL)application:(UIApplication *)application continueUserActivity:(NSUserActivity *)userActivity restorationHandler:(void (^)(NSArray * _Nullable))restorationHandler
{
	if ([userActivity.activityType isEqualToString:NSUserActivityTypeBrowsingWeb]) {
		NSURL *url = userActivity.webpageURL;
		NSString* connectionCode = [url pathComponents][2];
		if(connectionCode){
			SupportcomCloudSDK *handl = [SupportcomCloudSDK sharedInstance];
			[handl connectToAgent:connectionCode];
		}
	}
	return true;
}
For Swift 3.0:
func application(_ application: UIApplication, continue userActivity: NSUserActivity, restorationHandler: @escaping ([Any]?) -> Void) -> Bool {
	if (userActivity.activityType == NSUserActivityTypeBrowsingWeb) {
		let url = userActivity.webpageURL!
		let connectionCode = url.pathComponents[2];
		if connectionCode != "" {
			let handl = (SupportcomCloudSDK.sharedInstance() as AnyObject)
			handl.connect(toAgent: connectionCode)
		}
	}
	return true
}
Register your application URL and support phone number with Support.com Cloud
Once your application is tested, reviewed by Apple and available on iTunes, please register the application URL with Support.com Cloud.
1.Log into your Support.com Cloud account.
2.Goto Admin > Integration.
3.Click on Third Party Apps in the drop-down.
4.Click on iOS tab and turn ON the Status slider.
5.Now provide the application details: Name, iTunes URL and Connection Guide URL.
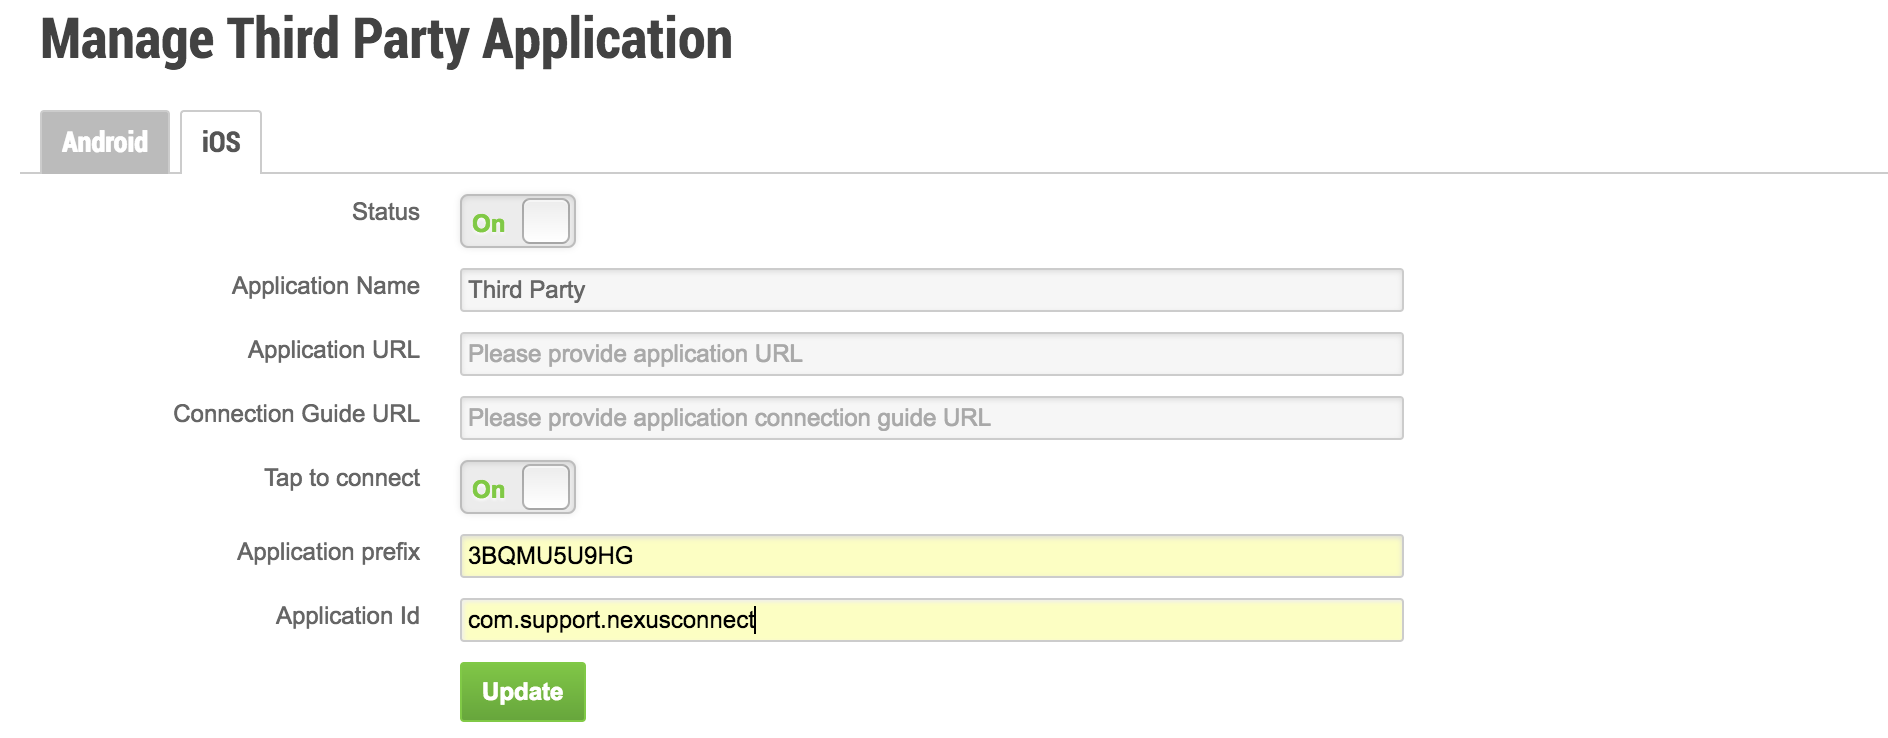
NOTE: If you do not enable the above, the default Support.com Connect iOS App will be available.
6.Enable “Tab to connect” option only if your App supports Auto Connect Link, and enter your application prefix & Application ID.
7.Click on Update.
Frequently Asked Questions
How much size will the iOS SDK add to my ipa?
iOS SDC Connect SDK will add about 11 MB to your ipa and 24 MB to the footprint of your app.
You may have observed that the iOS SDK zip file is about 48 MB in size and post decompression it is about 150 MB. This is so because the SDC Connect SDK includes various additional items that add to the size of the zip, but are eventually not shipped as part of your application. For example, we include i386 etc architectures to enable debugging via simulator. This architecture is not needed when the app runs on iphone/ipad device and is stripped out. Because of this the actual addition to the size of your ipa is much less at about 11 MB.