Support.com Cloud SDK for Android
Overview
Support.com Cloud SDK for Android enables you to deliver Assisted and Self Support to your customers, from within your application. It allows support to be provided in the context of the user’s interaction with your application, thereby increasing the efficiency of support interaction.
Using SDK, your customers can solve support problems on their own through SelfHelp or can escalate support session to a Live agent.
Support.com Cloud SDK offers an array of benefits to your Agents:
1. Ability to engage the customers instantly through Chat.
2. Capability to collect device vitals and perform remote diagnostics like configuring WiFi etc.
3. Allows your agents to view the screen of your application running on the connected mobile device.
In case of Samsung devices which are on Android version 4.2 and above, agents can remotely control the mobile device.
4. Enables Live Camera streaming (a.k.a “SeeSupport”) during a support session.
5. Allows your agents to Co-Browse with the customer (i.e simultaneous viewing and accessing of the same web
page highlighting different elements).
6. Allows your customers to resolve support issues by themselves through Self Service mode.
7. Allows your customers to get into an instant chat with Agent or make a phone call for support issues right from within the app.
This guide is intended to assist Android developers who want to embed Support.com Cloud SDK into their Android Applications. The guide explains step-by-step process to integrate SDK in your application.
Points to know:
- For Support.com Basic Cloud SDK minimum version of supported Android platform is SDK level 15
- For Support.com Full Cloud SDK minimum version of supported Android platform is SDK level 16
Contents
- Concepts
- Download Support.com Cloud SDK
- Integrating Support.com Cloud SDK in your App
- Create Application Token (JWT) in Support.com Cloud
- APIs
- Branding
- Auto Connect Link Support
- Registration
Concepts
Guided Paths A Guided Path is a set of instructions (/steps) that an agent &/or consumer can follow to fix a technical support issue. For instance, if you are an IoT oriented company, your Guided Paths could include: - How to connect a Smart Bulb the first time How to reset Smart Bulb How to replace battery in a thermostat How to get your Smart Devices connected to your hub Support.com Cloud allows you to create both agent and consumer facing guided paths.
Help-Ids and Tags Support.com Cloud allows you to associate help-ids and tags with your guided paths.
Help-ID A help-id is an alias for your guided path. There is a one-to-one mapping between a guided path and a help-id. However, you can remove an existing help-id from one Guided Path and add it to another Guided Path. Support.com Cloud SDK allows you to reference a help-id to show a specific guided path to your consumer, from within your application For instance, continuing with the previous IoT example, lets assume that the first screen on your app is the on-boarding screen. If the consumer clicks on help on this screen, you could use the Support.com Cloud SDK to open the 4th Guided Path.
Tags Tags allow you to configure a family of related guided paths. As an example, assume you associated a tag of LightBulb with both GP 1 & 2. You can then configure the Help button on your LightBulb screen to show guided path 1 & 2. Self Help screens shown by Support.com Cloud SDK, will also allow your user to reach out to your agents via a single click on Live Help.
Context Support.com Cloud SDK allows you to log important context pertaining to your user and the application. You can log :
- User’s identity information
- Device/Application logs
- Breadcrumb/activities etc.
If/when your consumer transitions from Self Help to Assisted Support, your agent will be able to view all of this context as well as all consumer actions on the guided paths.
Building further on the previous example, if the consumer clicked on Help on Light Bulb screen and used Guided Path 2, then your agent will be able to view all of this information including : - 1. Any device attributes you may have logged (state/reachability of the device) Guided Path executed by the consumer (example: How to reset Smart Bulb) If you logged the consumer information, then Support.com Cloud will even create a consumer record in the system.
Live Help As mentioned before, Self Help screens shown by Support.com Cloud SDK, will also allow your user to reach out to your agents via a single click on Live Help. However, Support.com Cloud SDK also allows you to directly take your consumer to Live Help. When the session transitions to live help, your agent will be able to use all the tools such as chat, co-browse, support cam from within your application.
Download Support.com Cloud SDK
1. Download Support.com Basic Cloud SDK for Android. Basic version of SDK includes all the above listed features except Live-Camera streaming (SeeSupport) functionality.
2. Download Support.com Full Cloud SDK for Android. Includes all the above listed features with Live Camera streaming functionality.
Sample App can be accessed here
Integrating Support.com Cloud SDK in your App
Integrating Support.com Basic Cloud SDK
1. Launch Android studio.
2. Unzip the Support.com Basic Cloud SDK and extract AAR files.
3. Copy all extracted AAR files into your project’s libs directory.
4. Add the following dependency to your app/build.gradle file:
repositories {
    flatDir {
        dirs 'libs'
    }
}
dependencies {
    compile(name: 'sprtUILib', ext: 'aar') { transitive = true }
    compile(name: 'sprtBaseLibrary', ext: 'aar')
    compile(name: 'sprtRemoteBaseLibrary', ext: 'aar')
    compile(name: 'sprtRemoteInterface', ext: 'aar')
    compile 'com.android.support:design:23.1.1'
    compile 'com.android.support:appcompat-v7:23.1.1'
}
5. Application class: Your application class needs to extend SprtApplication:
public class MyApplication extends SprtApplication { //do nothing}
6. Add the following lines to your manifest file inside < application > tag:
	<application
	android:name=".MyApplication"
	tools:replace="android:theme, icon"
	. . .>
Integrating Support.com Full Cloud SDK
To enable Live Camera streaming(SeeSupport) feature you need to integrate Support.com Full Cloud SDKs with your Application.
1. Repeat the above steps 1 to 6 for Support.com Full Cloud SDK.
2. Modify app/build.gradle to add the following dependencies:
defaultConfig {
        .
        .
        .
        multiDexEnabled true
}

dependencies {
    .
    .
    .
    compile(name:'sprtSeeSupportLibrary', ext:'aar')
    compile 'com.opentok.android:opentok-android-sdk:2.8.+'
}
- Edit the project/build.gradle for your project and add the following code snippet to the allprojects/repositiories section:
allprojects {
    repositories {
        jcenter()
        maven {
            url  "http://tokbox.bintray.com/maven"
        }
    }
}
Create Application Token (JWT) in Support.com Cloud
To use the Support.com Cloud SDK, you need to create and register your application token with Support.com Cloud.
-
Log into your Support.com Cloud account.
-
Goto Admin > Integrations > Application Tokens.
-
Click on Add New.
-
Fill in details of your application: Name, Version, Unique Token ID.
-
Select Client Apps only in Audience.
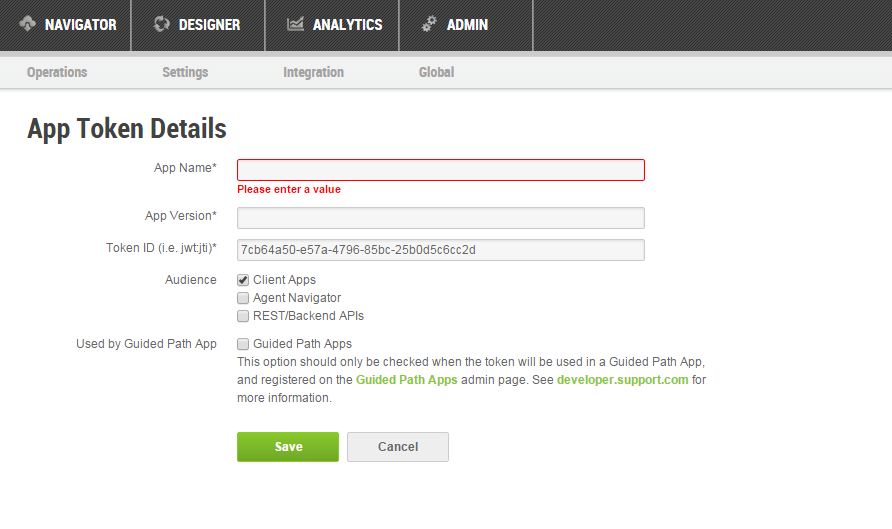
-
Click Save.
-
Click on View JWT button.
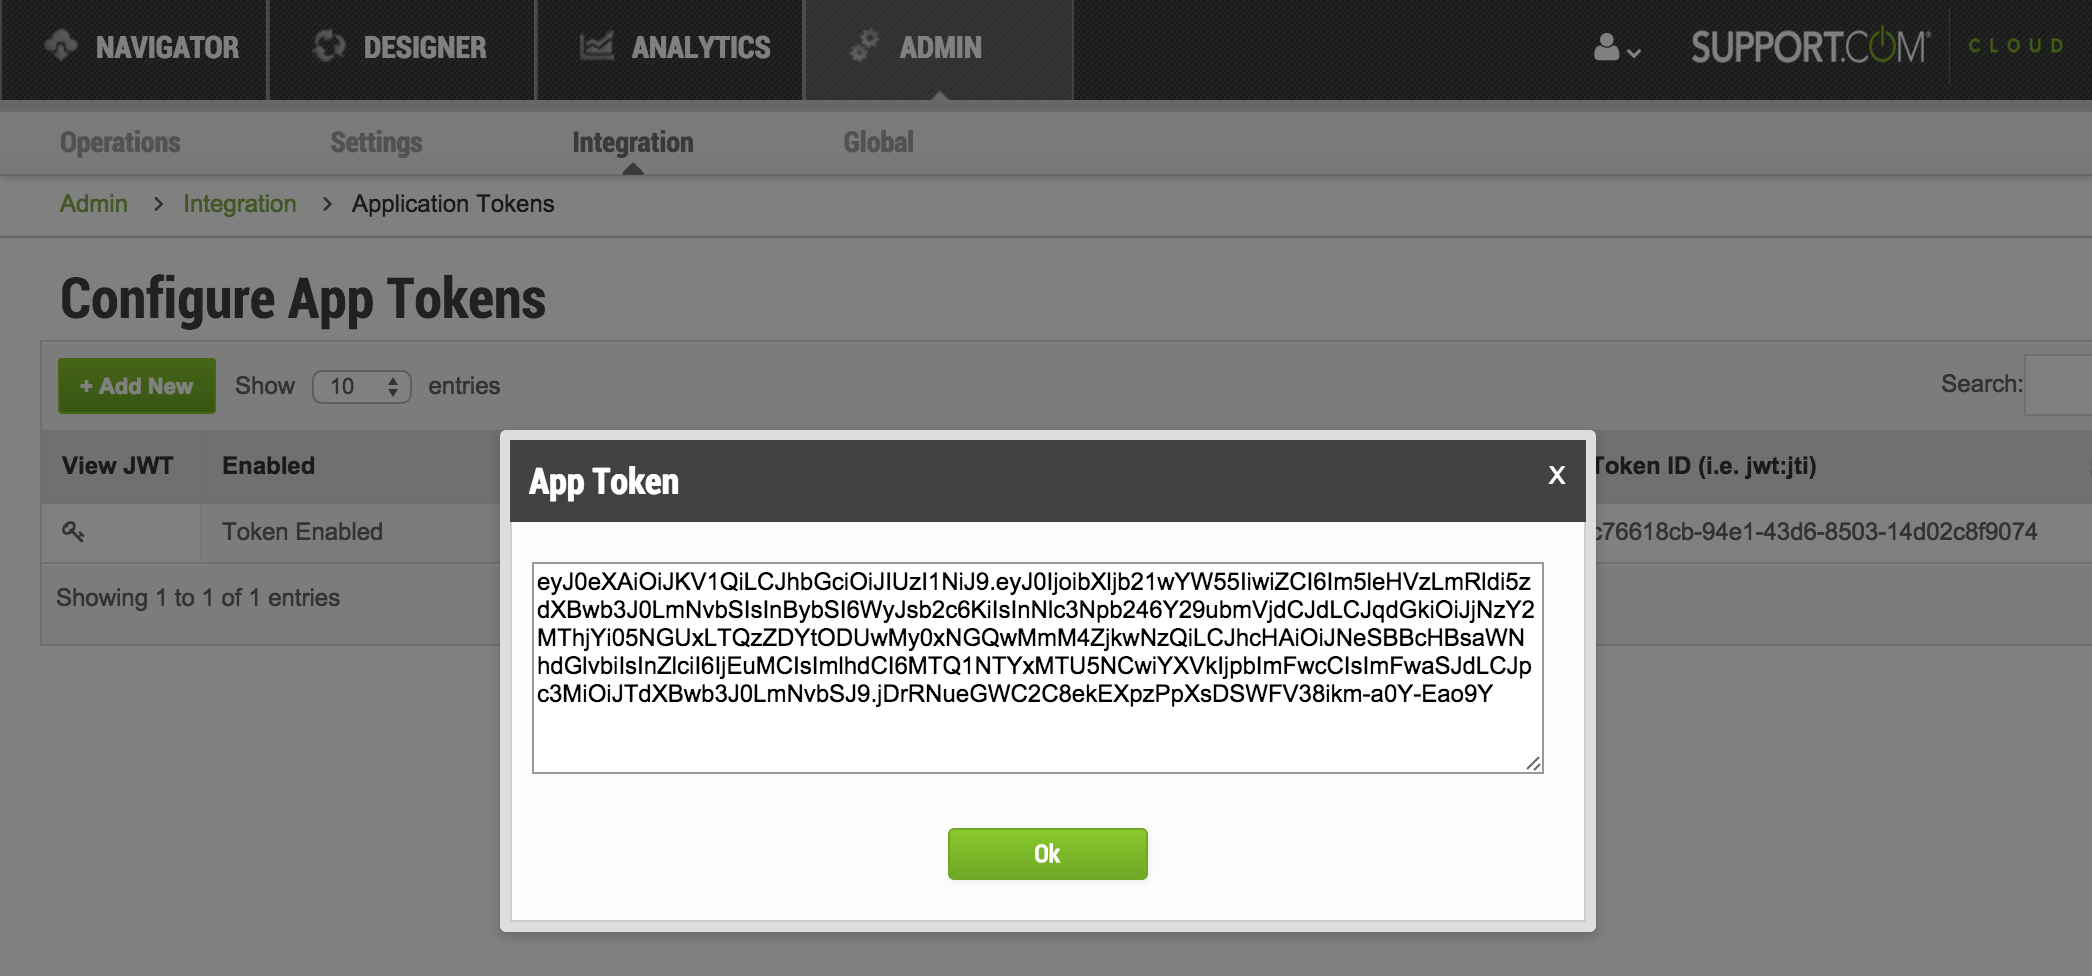
-
Copy the token. To use the SDK, you will be required to send this token as a parameter to the API.
APIs
Complete API documentation can be found at API Doc.
1. Initialization
You should invoke initialize API from onCreate method of your application class. This API accepts one argument, an application token, which is used to authenticate and authorize your application with Support.com Cloud. You would have generated your JWT ApplicationToken above. Declare NexusConnectSDK inside your java file from where you want to initiate support session:
import com.sprt.android.esnuilib.initialize.NexusConnectSDK;
API usage: From your first activity’s onCreate() method, call
NexusConnectSDK.initialize(@Your_JWT_Application_Token);
2. SelfHelp
Using Self Help APIs, you can embed Self Help directly in your application and surface relevant guided paths. Self help topics can be queried by help id or an array of tags. For detailed information on SelfHelp concepts, refer Concepts.
- 2.1 Self Help by Help-Id:
	NexusConnectSDK.showSelfHelpForId(Activity activity, String helpId, String[] displayOrder, int parentLayoutId);

    @param activity:       Calling activity context.
	@param helpId:           Id of guided path(s).
	@param displayOrder:   Order in which self support page should load (For ex. search, categories, paths, etc). Defaulf value is null.
	@param parentLayoutId: Resource id of the layout where self help will be displayed. If passed, then the self help opens in the same layout, else will open in SelfSupport-LiveSupport activity. Pass -1 to display SelfSupport-LiveSupport activity.
Note: A HelpId uniquely identifies a Guided path.
- 2.2 Self Help by Tags:
	NexusConnectSDK.showSelfHelpForTags(Activity activity, String []tags, String[] displayOrder, int parentLayoutId);

    @param activity:       Calling activity context.
	@param tags:           tags of guided path(s).
	@param displayOrder:   Order in which self support page should load (For ex. search, categories, paths, etc). Defaulf value is null.
	@param parentLayoutId: Resource id of the layout where self help will be displayed. If passed, then the self help opens in the same layout, else will open in SelfSupport-LiveSupport activity. Pass -1 to display SelfSupport-LiveSupport activity.
Note: A Tag can be associated with one or more guided paths.
- 2.3 Context:
- 2.3.1 User Identity: Identity: A user’s identity context generates a corresponding consumer within Support.com Cloud. All calls accept a single string argument. You can set all Identity parameters simultaneously like
NexusConnectSDK.setEmail(email).setFirstName(firstName).setLastName(lastName).setPhone(phone);
Or you can set individual Identity parameter as follows
NexusConnectSDK.setEmail(email);
Additionally, you can set id of your external system, for instance CRM, using following:
NexusConnectSDK.setExternalId(String myCRMId);
**Note**: All SelfService calls clears the context by default. If you want to preserve this context data between support calls, call api
NexusConnectSDK.preserveContext(boolean preserve);
, before the self help and assisted service api calls.
- 2.3.2 Logging / data: The context APIs also provide support for logging actions, device information, or content information about a user. You can log user actions by sending Action name and optional map object:
		NexusConnectSDK.logAction(String actionName);
		NexusConnectSDK.logAction(String actionName, HashMap<String, Object> map);
You can remove previously logged action by sending action name:
public static NexusConnectSDKFluent removeAction(String action)
You can log device details by sending Device name and optional map object:
		NexusConnectSDK.logDevice(String deviceName);
		NexusConnectSDK.logDevice(String deviceName, HashMap<String, Object> map);
You can log content information by sending Contenttype, content and optional map object:
		NexusConnectSDK.log(String type, String content);
		NexusConnectSDK.log(String type, String content, HashMap<String, Object> map);
You can log your custom data in key-value pairs:
NexusConnectSDK.setData(String key, String value);
- 2.3.3 Clearing Context: You can also clear a user’s context, or their identity information, specifically by calling following APIs. To clear context at any time, use following API
NexusConnectSDK.clearContext();
To clear user identity, use following API
NexusConnectSDK.clearIdentity();
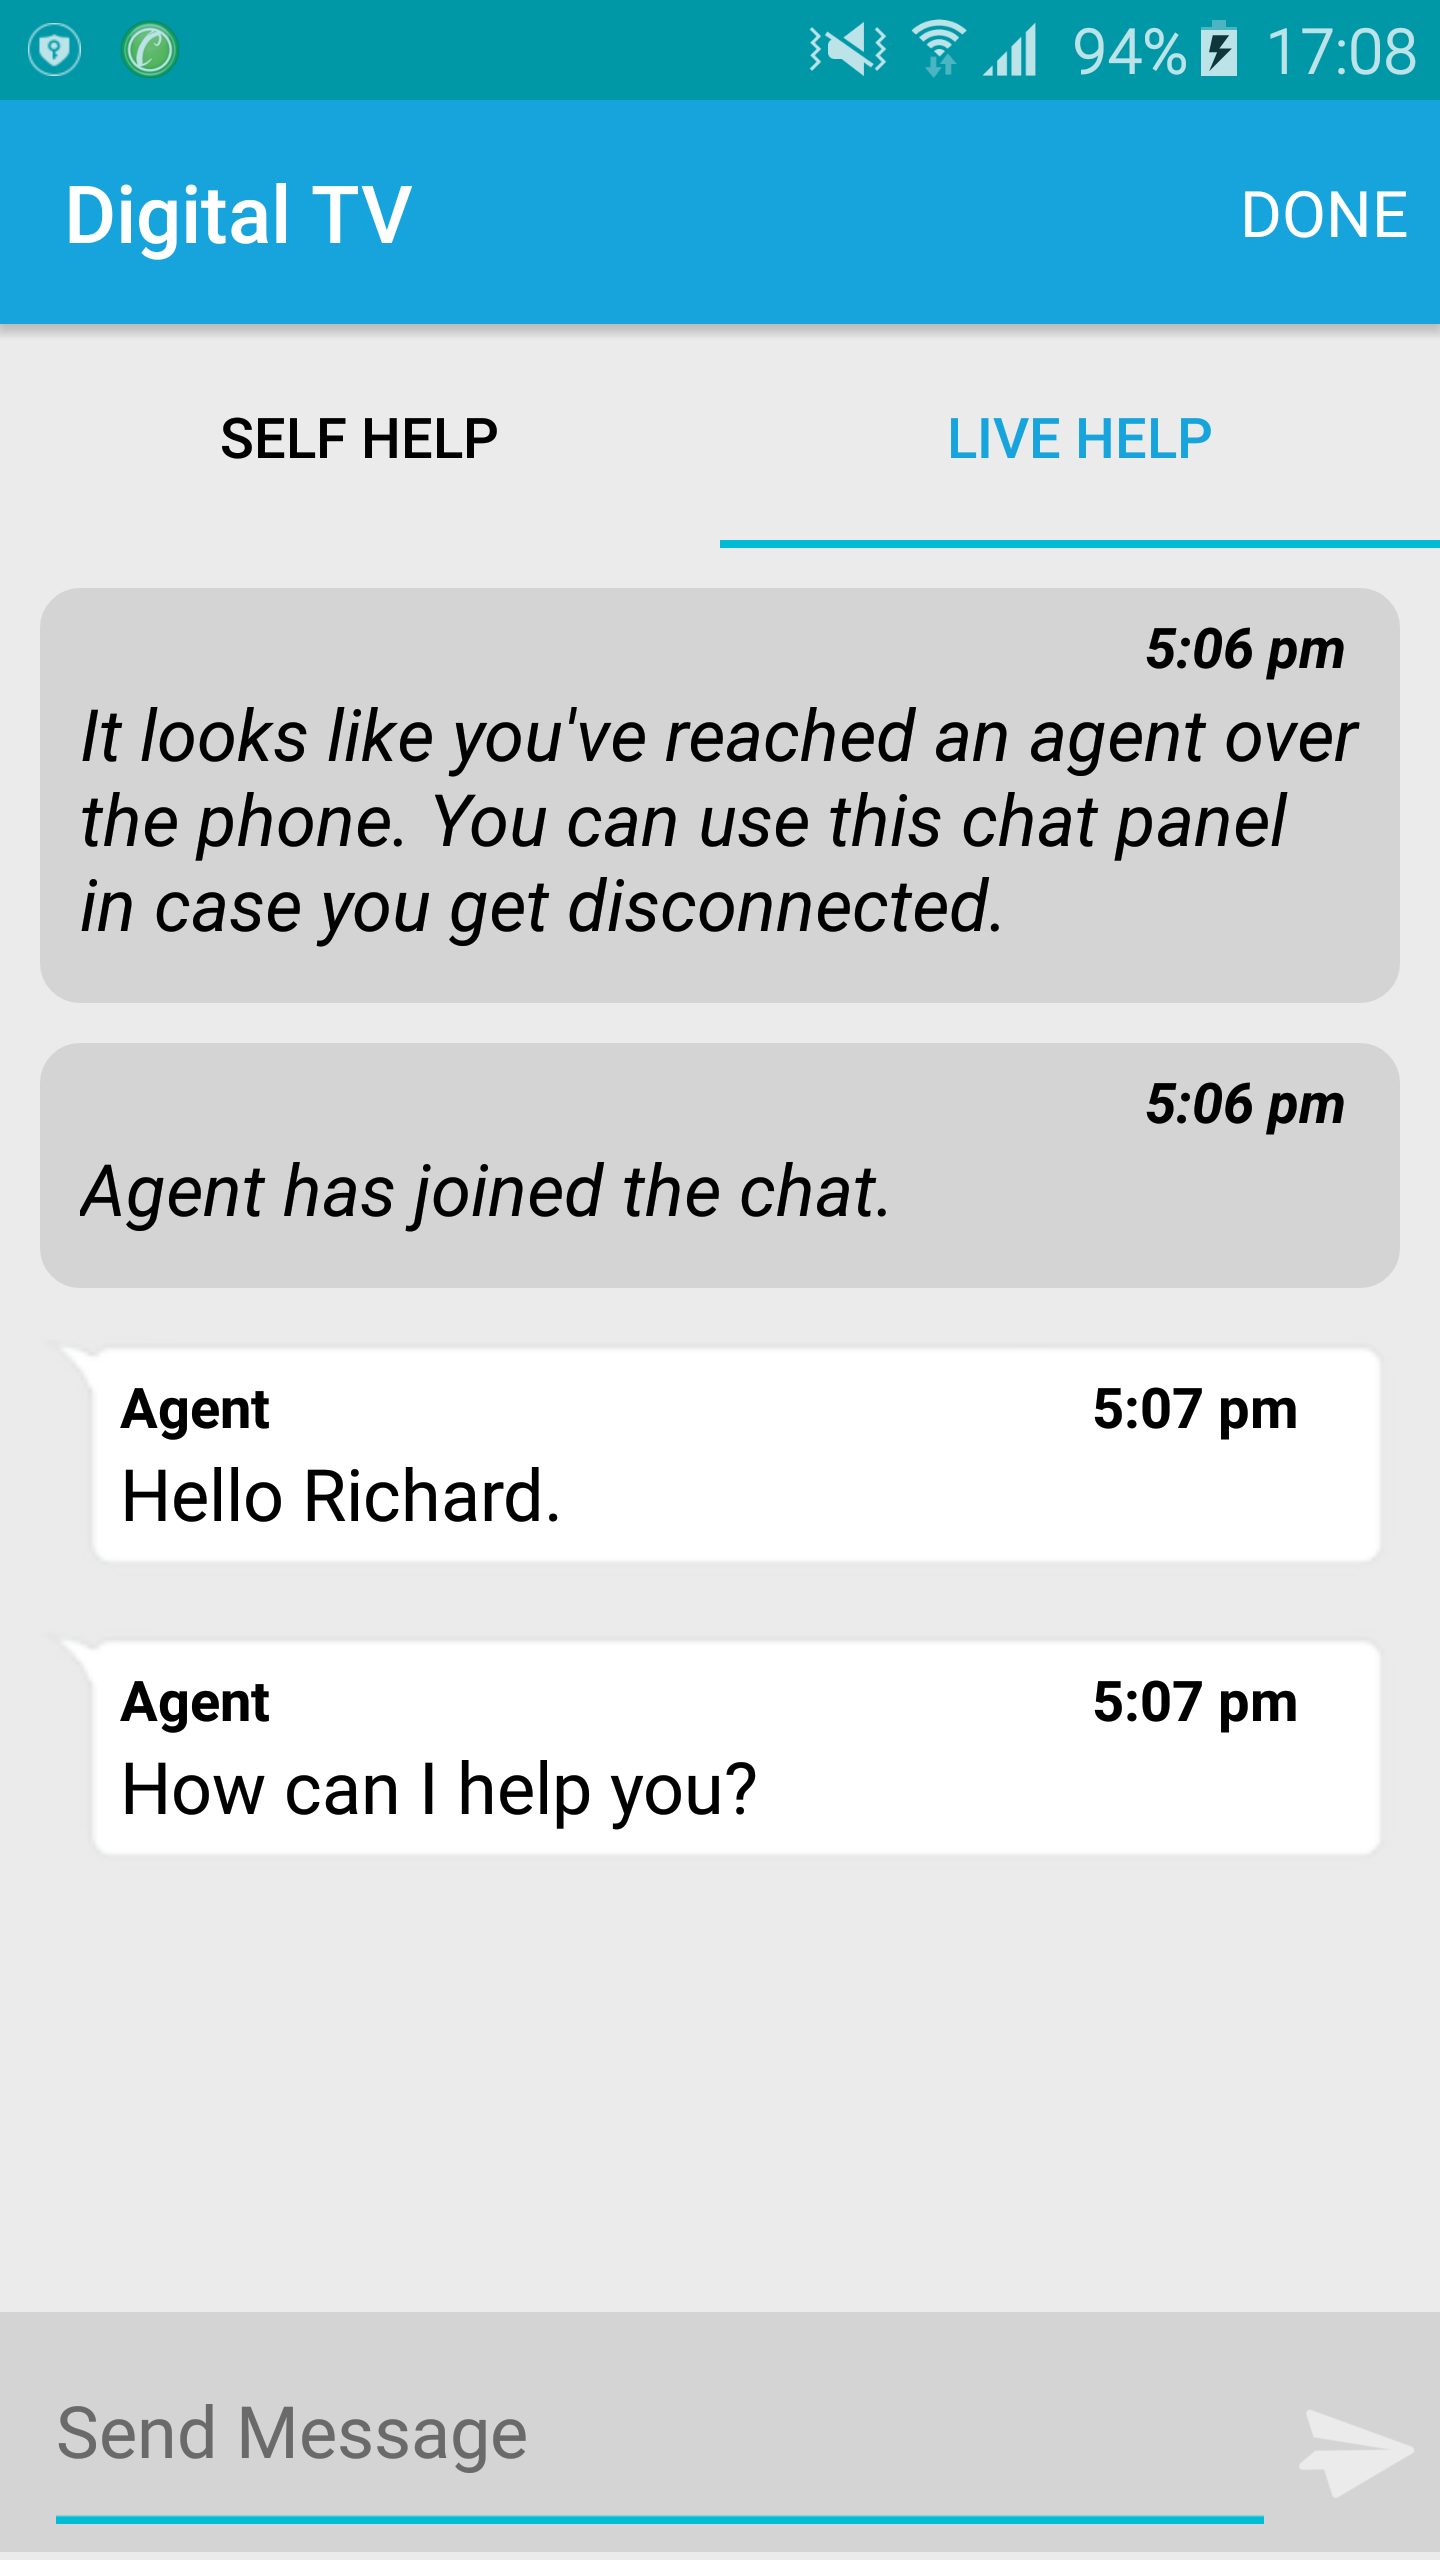
- 2.3.4 Escalation from Self to Assisted When your customer could not fix the problem through SelfHelp, (s)he can escalate the issue to a Live Agent. Customer can connect to Agent using instant chat option or by making a phone call. For this, you need to provide agent info inside strings.xml.
		< string name="help_number" > AGENT_PHONE_NUMBER < /string>
		< string name="skill" > AGENT_SKILL < /string>
<img src="/static/img/chatcall.png" alt="ChatCall Screen"  style="width: 400px; border:solid 1px black;float: none; !important;"/>

Upon escalation, a live support session will be created in Support.com Cloud.
To know, if a Live support session is running in background, call:
NexusConnectSDK.isLiveHelpActive();
To exit Live support session, call:
NexusConnectSDK.exitHelp();
**Note** If/when your consumer transitions from Self Help to Assisted Support, your agent will be able to view all of this context as well as all consumer actions on the guided paths.
3. Pure Live Help
showLiveHelp: Use this API only if your App needs pure “Assisted/Live” help mode(without “SelfHelp”). Here second parameter is optional and can be pass null.
NexusConnectSDK.showLiveHelp(Activity activity, Object... intentData)
Use below API to control exit session on back press from SDK main screen:
NexusConnectSDK.exitOnBackPress(boolean exit)
When you are done with Live support session, call:
NexusConnectSDK.exitHelp()
To start an Assisted session with Agent, your customers can call your help phone number, to talk to your support agent. Your agents can create a Support Session in Support.com Cloud and provide the customers with a connection code to be entered on this screen. Once that’s done, your application will be connected to the Support.com Cloud Server.
Once the session is started, your technical agents can then use all features of the Support.com Cloud SDK: chat with the customer, co-browse your app, push URLs, execute supported commands and use SupportCam.
4. activityPaused
You must invoke this API from onPause() method of all of your activities.
			@Override
				protected void onPause() {
					super.onPause();
					NexusConnectSDK.activityPaused(this);
					// your code here
				}
5. activityResumed
You must invoke this API from onResume() method of all of your activities.
			@Override
				protected void onResume() {
					super.onResume();
					NexusConnectSDK.activityResumed(this);
					// your code here
				}
6. Full remote support
For Samsung devices running Android version 4.2 (or higher), SDK offers device full remote capability. This capability is turned “OFF” by default. You can activate full remote by making following changes to your string.xml.
< string name="enable_samsung_remote" > FALSE < /string>
7. Device Orientation
You can lock the SDK orientation using below API:
		NexusConnectSDK.setOrientation(int orientation)
Possible values includes ActivityInfo.SCREEN_ORIENTATION_PORTRAIT, ActivityInfo.SCREEN_ORIENTATION_LANDSCAPE, etc. If not passed, SDK will take default device orientation.
Branding
You can change the default resources (like: icon, text, color, link, etc.) used in SDK.
1. Steps to change font Size of particular view:
a. Identify the view font size you want to change (For e.g. Connect Button text size).
b. Open your project directory and navigate to \app\src\main\res\values\dimens.xml.
c. Open dimen.xml file.
d. Use attached file customization.xml to find the unique font size name for the view you want to change (For connect button use id connect_button_text_size).
e. Copy the selected id in your dimen.xml (<dimen name="connect_button_text_size">32sp</dimen>).
f. Now you can specify your custom font size value.
2. Steps to change Font color of particular view:
a. Identify the view font color you want to change (For e.g. Connect Button text color).
b. Open your project directory and navigate to \app\src\main\res\values\colors.xml.
c. Open colors.xml file.
d. Use attached file customization.xml to find the unique font color name for the view you want to change (For connect button use id connect_button_text_color).
e. Copy the selected id in your colors.xml (<color name="connect_button_text_color">#000000</color>).
f. Now you can specify your custom font color value in HEX-RGB format.
3. Steps to change text of particular view:
a. Identify the view text you want to change (For e.g. Connect Button text).
b. Open your project directory and navigate to \app\src\main\res\values\strings.xml.
c. Open strings.xml file.
d. Use attached file customization.xml to find the unique text name for the view you want to change (For connect button use id connect_button_text).
e. Copy the selected id in your colors.xml (<string name="connect_button_text">CONNECT</string>).
f. Now you can specify your custom text value.
4. Steps to change icon:
a. Identify the icon you want to change (For e.g. Notification icon).
b. Use attached file customization.xml to find the unique name for the icon you want to change (For notification icon use id ic_notification).
c. Before making any change, make sure that you have the new icon for all the resolutions (mdpi, hdpi, xhdpi, xxhdpi, etc.).
d. Place all the version of icon in their respective drawable folders.
e. Rename the icons in all folders to ic_notification.
5. Font-Awesome Icon Customization:
We have used Font-Awesome (FA) icons in our SDK. Font-Awesome icons can be customized by providing either font awesome icons or PNG icons. For changing any FA icon, with another FA icon you just need to override its corresponding reference(Unicode) in your strings.xml.
For changing FA icon with PNG:
a. Identify the icon you want to change (For e.g. chat icon).
b. Use attached file customization.xml to find the unique name for the icon you want to change (For chat icon use name chat_icon.png).
c. Before making any change, make sure that you have the new icon for all the resolutions (mdpi, hdpi, xhdpi, xxhdpi, etc.).
d. There are some icons which require both enabled and disabled state icons. We need to provide separate icons for them.
d. Place all the version of icon in their respective drawable folders.
e. Make sure that the icon name is same in all the drawable folders (chat_icon.png).
NOTE You need to use PNG icon which was created by following Android Icon Design Guidelines.
Please refer excel document customization.xml for configuration details.
6. Notification You can also configure SDK notifications (Vibration, ringtone and LED light color). Refer document customization.xml for configuration details.
Auto Connect Link Support
This feature will enable your application to launch automatically and connect to support session as soon as user clicks the SMS link provided by support agent. For this feature to work as expected application will have to make following code changes:
AndroidManifest file changes: Append below code to any intent-filter of any activity:
 <intent-filter>
	<action android:name="android.intent.action.VIEW"></action>
	<category android:name="android.intent.category.DEFAULT"></category>
	<category android:name="android.intent.category.BROWSABLE"></category>
	<data android:scheme="https" android:host="YOUR_DOMAIN_NAME_HERE" android:pathPattern="/connect/..*"></data>
 </intent-filter>
In above code replace “YOUR_DOMAIN_NAME_HERE” with your tenant domain name (For e.g. “test.nexus.support.com”).
Activity file changes: Based on above intent-filter, the targeted activity will start on click of connect link. You need to add below code to your activity class.
@Override
protected void onCreate(Bundle savedInstanceState) {
	super.onCreate(savedInstanceState);

	if(getIntent().getData() != null)
         NexusConnectSDK.showLiveHelp(this, getIntent().getData());

}
Registration
You should register the application’s playstore URL with Support.com Cloud.
1.Log into your Support.com Cloud account.
2.Goto Admin > Integration.
3.Click on Third Party Apps in the drop-down.
4.Click on Android tab and turn ON the Status slider.
5.Now provide the application details: Name, Playstore URL and Connection Guide URL.
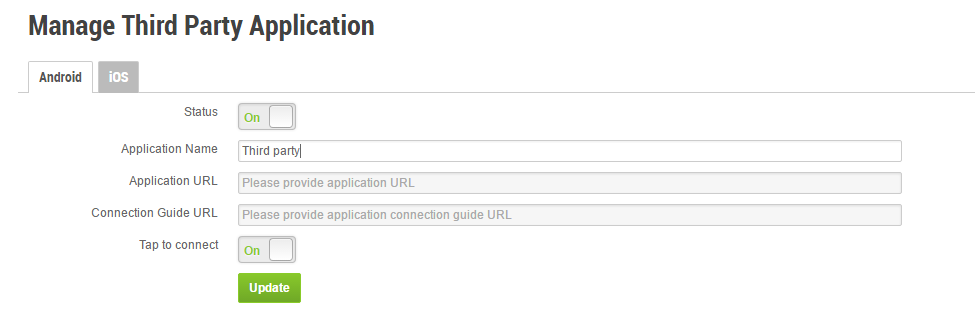
NOTE: If you do not enable the above, the default Support.com Connect Android App will be available.
6.Enable “Tab to connect” option only if your App supports Auto Connect Link.
7.Click on Update.